Learn the seven essential steps to writing an autobiography: from choosing your focus to publishing your finished manuscript. A simple, structured guide to help you tell your life story with confidence.
Introduction: Why a 7 Step Framework Helps You Finish Your Life Story
Most people freeze the moment they picture their entire life squeezed into a book. It feels huge, messy, emotional, almost like trying to hold years of memories in your hands without dropping anything important. And if you have ever searched what to include in an autobiography, you have probably fallen down a rabbit hole of conflicting tips and vague advice that only make you feel more overwhelmed.
Here is the truth: writing your life story is not impossible. It is simply too big to tackle all at once. The real secret is breaking it into simple, repeatable steps that carry you from “I do not know where to begin” to “I cannot believe I finished this.”
Before you write a single sentence, you need to understand what an autobiography is. It is your life story told by you, in your own voice, covering the experiences that shaped you. Once you understand the form, a structured path suddenly makes everything clearer. Many leading writing guides use a multi step process for a reason. Focusing, planning, drafting, revising, and finally sharing your story becomes far easier when each stage has a clear purpose.
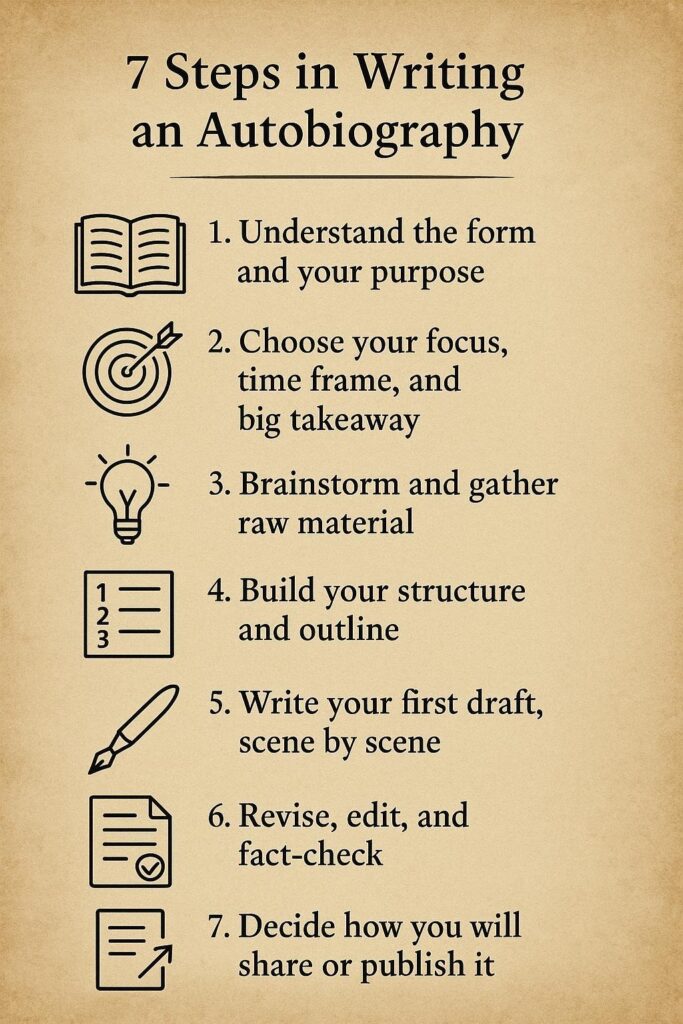
In this guide, you will walk through the seven steps used in top writing systems:
- Understand the form and your purpose
- Choose your focus and theme
- Gather raw material
- Build your structure and outline
- Draft scene by scene
- Revise and edit
- Decide how to share or publish your work
By the end, you will not only know what to include in an autobiography or an autobiography. You will know exactly how to move from idea to finished manuscript without second guessing yourself.
Step 1: Understand What an Autobiography Is and Why You Are Writing One
What an Autobiography Actually Is
Before you write a single scene, you need a solid grasp of the form you are working with.
An autobiography is your full life story written by you. It usually spans a large part of your life and is told in your own voice.
To avoid confusion, here is the simple breakdown:
Autobiography: your life story written by you
Biography: your life story written by someone else
Memoir: a focused slice of your life built around a theme or period
Understanding the difference helps you avoid wandering into memoir territory when your goal is a full life story.
Why Your Purpose Matters
Your purpose shapes everything. It influences the tone, the level of detail, and the emotional depth you bring to the page.
Common reasons people write autobiographies:
- To leave a legacy for family
- To complete a school assignment
- To build authority or a personal brand
- To process life events
- To publish for a wider audience
Even an autobiography writing company would tell you that clarity of purpose determines how your narrative flows.
Who You Are Writing For
Your audience directs how you tell your story.
If you are writing for family, you can assume a shared understanding of certain people or events. If you are writing for general readers, you need to offer more context and explanation.
Ask yourself:
- Who will read this?
- What do they already know?
- What do they need you to explain?
- How honest and vulnerable do you want to be?
Why Step 1 Comes First in Every Framework
Most seven step writing systems begin here because everything else depends on it. Once you understand the form, your purpose, and your audience, the next steps feel less overwhelming and far more focused.
Step 2: Choose Your Focus, Time Frame, and Big Takeaway
Why You Need a Clear Focus
Before you start piecing together scenes from different years of your life, you need to decide what your autobiography is really about. Not every moment deserves equal attention. Your focus acts like the lens of a camera. A tight lens creates clarity. A loose one blurs the entire picture.
Your focus might be resilience, migration, career growth, spiritual change, or the legacy of your family. Once you choose the central thread, your story stops feeling like a random collection of memories and starts feeling like a journey with direction.
Choose Your Time Frame
Next, decide how much of your life you want to cover.
Some autobiographies stretch from childhood to the present day. Others zoom in on a single era that shaped everything that came after.
Ask yourself:
- Do I want to write a birth to now story?
- Or do I want to focus on a specific chapter of my life?
- Which period changed me the most?
Your time frame is the container that holds your story. The tighter the container, the more powerful your narrative becomes.
Define Your Core Message
Every strong autobiography leaves the reader with something meaningful. This is your takeaway. It answers the quiet question behind every life story: What did all of this mean?
Use these prompts to guide you:
- What do I want people to understand about me by the final page?
- What feeling do I want them to carry with them?
- What truth sits at the heart of my experience?
Your takeaway shapes your tone, your storytelling choices, and the scenes you highlight or skip.
Why This Step Appears in Most Seven Step Guides
Top writing frameworks list this step early because it simplifies everything that comes later. If you know the focus, the timeframe, and the message, outlining becomes easier, drafting becomes faster, and revising becomes cleaner. Even professional ghostwriters start by identifying the story’s central question before shaping the narrative.
Step 3: Brainstorm and Gather Raw Material
Step 3 is where your autobiography begins to take shape in a real, tangible way. Up until now, you have made decisions about focus and purpose. Now you shift into collecting the pieces of your life story. Think of this stage as gathering clay before you start sculpting. You are not shaping anything yet. You are simply gathering everything that might matter so that when it is time to outline and draft, you have the pieces ready.
Create a Life Timeline
Start with a simple timeline. It does not need to look pretty. It does not need to be perfectly accurate. Just begin writing down the major events and turning points of your life. Include the before and after moments that changed the direction of your story. Add the years or the approximate time period if you cannot remember exact dates. You are trying to see the broad arc of your life so you can understand where your story naturally gains momentum.
Your timeline might include childhood memories, school experiences, significant moves, relationships, losses, achievements, conflicts, and moments when your beliefs shifted. Anything that shaped who you became belongs on this early list.
Mine Your Memory Sources
Next, explore the places where your past still lives. Your memory is only one source. You can also gather journals, notebooks, old letters, emails, texts, photographs, family albums, certificates, medical records, school documents, or even social media posts. These external sources can help you fill in details that your memory has blurred. They can also bring back moments you forgot.
Do not rush this part. Let yourself sit with old photos or messages and see what emotions rise. Sometimes a single picture can bring back an entire scene or a forgotten chapter of your story.
Interview Others for Missing Pieces
If you want a richer, more complete narrative, consider talking to people who shared parts of your life. Family members, siblings, friends, mentors, colleagues, and even old classmates can help fill in the gaps. They might remember details you missed. They might remember events differently. Both of those can help you understand the complexity of your story. You do not need to interview everyone. Choose the people who can give depth and clarity to the moments that matter most.
Brainstorm Freely
Finally, set aside time for open brainstorming. Write lists of people who shaped you. Write lists of places that marked different seasons of your life. Create mind maps that link events to emotions or lessons. Free write for ten minutes about a memory without stopping to think. These exercises unlock scenes that you may not recall consciously.
Why This Step Matters
Almost every seven step writing framework includes a brainstorming stage because this is where you gather the raw material that becomes your book. Once you have your memories, moments, and emotional beats collected, outlining becomes far easier and far more accurate.
Step 4: Build Your Structure and Outline
Step 4 is where your autobiography starts feeling like an actual book instead of a loose collection of memories. This is the stage that gives writers the most relief because once you have a structure, the writing becomes smoother, faster, and far less overwhelming. An outline is not a cage. It is a map. It frees you from that heavy feeling of not knowing what comes next and gives you a clear path from the first page to the last. This section will be longer than 400 words so you can fully shape the architecture of your story.
Choose Your Overall Structure
Start by choosing the structure that fits your story best. The most common is chronological, where you move through your life in order from childhood to adulthood. This structure is simple, natural, and helps readers follow your growth. A thematic structure organizes your chapters around ideas instead of years. You might group chapters by identity, relationships, places, or lessons. A hybrid structure blends the two. You might open with a powerful present day moment, then move backward into your past, then move forward again as the theme unfolds. All three structures work. The right one depends on the shape of your story and the impression you want to leave.
Use the Three Part Arc
Even in nonfiction, the classic three part arc gives your story a natural flow.
The beginning sets the stage. Readers learn who you were, where you came from, and what shaped your early world. The middle covers the conflicts, challenges, discoveries, and changes that create your emotional journey. The end brings readers into your present life and shows them what it all means. This arc mirrors the way human transformation actually works, and it helps you understand which scenes belong in the spotlight.
Turn Your Timeline Into an Outline
Now return to your brainstorming notes and timeline. Begin choosing which events truly matter. Not every memory needs to go into the outline. Keep only the moments that connect to your focus, your message, or your emotional turning points. Group related memories into chapters. Think in scenes. A chapter can hold one major scene or several smaller ones that speak to the same theme. Ask yourself what to include in an autobiography that gives the reader clarity and connection. The answer almost always comes down to choosing meaning over quantity.
Balance Scene and Summary
Scene gives your story life. Summary gives your story momentum. A full scene has dialogue, detail, emotion, and a sense of presence. A summary skips through time quickly. Use scenes for the moments that changed you and summaries for the transitions between them. This balance keeps your narrative strong and engaging without exhausting your reader.
Why Outlining Matters in Every Seven Step Guide
Almost every writing framework emphasizes outlining because it prevents drift. Without an outline, you might write hundreds of pages that lead nowhere. With an outline, you know the emotional arc, the key events, and the purpose behind each chapter. It saves time, energy, and frustration.
Step 5: Write Your First Draft Scene by Scene
Step 5 is the moment your autobiography finally finds its voice. Up until now, you have been planning, gathering, and shaping the structure of your story. Now you start writing the actual pages that readers will experience. This is where your memories become scenes, your thoughts become narration, and your lessons become meaning. Many writers feel nervous at this stage, but once you begin writing scene by scene, something incredible happens. The story stops living in your head and starts living on the page.
Start With a Strong Opening
The opening sets the tone for your entire book. It does not need to begin at your birth. Instead, choose a moment that holds energy, tension, emotion, or curiosity. You might open with a vivid memory, a turning point, or a moment that hints at the larger theme of your life. A strong opening grips your reader and gives them a reason to follow your journey.
Write in Your Natural Voice
Your voice is the heart of your autobiography. Write the way you think and feel. Do not try to imitate other writers. Readers want your honesty, your rhythm, your personality. They want to hear the way you speak. Your voice becomes the thread that links every chapter together. If you ever feel unsure, remember this simple principle. Above all, stay true to who you are on the page.
Use Storytelling Craft
Even though an autobiography is nonfiction, it still needs the elements that make a story engaging. Show instead of telling through sensory details. Use dialogue to bring interactions to life. Place yourself inside the scene with thoughts, emotions, and reactions. Let readers see the room, hear the sounds, and feel the tension. When you build scenes like this, your life unfolds with clarity and depth.
Weave in Reflection and Meaning
An autobiography is more than a list of events. It is the meaning behind those events that matters. After writing a scene, step back and ask what it taught you, how it changed you, or why it still matters now. Reflection gives your story emotional weight. It turns moments into insight. It helps your reader understand not only what happened but why it shaped you.
Accept Imperfection at This Stage
Your first draft will be messy. That is how it should be. You are discovering your story as you write it. Do not aim for perfection. Aim for momentum. Many writers make the mistake of editing too early, which slows the process and drains creativity. Save the polishing for later, when you can use also hire professional biography editor to refine your work.
Why This Step Matters
Writing the first draft scene by scene keeps the process manageable. It allows you to focus on one moment at a time without worrying about the entire book. By the end of this stage, you will have a complete version of your story that is ready for revision.
Step 6: Revise, Edit, and Fact Check
Step 6 is where your autobiography becomes clearer, stronger, and more polished. The first draft gives you the story. Revision gives you the power to shape it into something meaningful and readable. Many writers think revision is only about correcting grammar, but it is much more than that. It is the stage where you strengthen your narrative, refine your voice, and make sure every part of your story has purpose. Think of this step as giving your book its second life, the version that feels intentional instead of rushed.
Look at the Big Picture First
Begin by reading your draft from start to finish. Avoid making small corrections at this stage. Focus on the overall arc. Ask yourself if the story flows naturally. Does the beginning lead smoothly into the middle. Does the ending offer clarity and meaning. Pay attention to places where the story feels slow, repetitive, or disconnected. Mark any sections that seem too long or too short. The goal is to understand how your story works as a whole before fixing smaller issues.
Check for Accuracy and Consistency
Your autobiography needs to feel trustworthy. Go through your draft and verify names, places, timelines, and important details. If dates are unclear, note them as approximate so your reader understands your intention. Look for inconsistencies in tone, voice, or emotion. Make sure your younger and older self sound authentic at each stage of life. Accuracy helps the reader stay grounded and feel connected to your experiences.
Handle Sensitive Material Carefully
Autobiographies often involve personal pain, family conflict, or difficult relationships. When revising these sections, think about the balance between honesty and respect. You can be truthful without harming others. Consider changing names where appropriate. Consider shortening scenes that feel too revealing for your comfort. If needed, seek advice from someone you trust to ensure you are sharing your truth while maintaining integrity.
Polish Your Writing Line by Line
Once your story works at the big picture level, move into line editing. Look for sentences that feel cluttered or unclear. Remove filler words. Replace vague language with specific detail. Cut clichés and repetitive phrases. Strengthen weak verbs. Check paragraph breaks to make sure the pacing feels smooth. This is where your writing becomes tighter, cleaner, and more impactful.
Get Outside Feedback
At this stage, fresh eyes can help you see what you missed. Share your revised draft with beta readers, a writing group, or a mentor. You can also work with professionals including an autobiography writing company if you want structured guidance. Outside feedback gives you clarity and helps ensure your story resonates with readers.
Step 7: Decide How You Will Share or Publish Your Autobiography
Step 7 is the stage where your hard work becomes something real, something you can hold in your hands or share with the people who matter most. This is where your story leaves your private writing space and enters the world. Publishing does not have to be complicated or intimidating. It simply requires clarity about your goals and an understanding of the options that fit your vision. This section is longer than 400 words so you can explore every path with confidence.
Clarify Your Publication Goal
Start by deciding what you want to achieve with your autobiography. Are you writing it as a private legacy for your family. Do you want to print copies for close friends. Are you hoping to self publish and share your story more widely. Or do you dream of pursuing a traditional publishing path. Your goal determines the formatting, the level of editing you invest in, and the distribution method you choose.
Private legacy books are simple. You can print a small number of copies and keep the process intimate. Self publishing gives you full control over design, pricing, and distribution. Traditional publishing offers broader reach, but it requires querying agents and competing for limited space. There is no wrong choice. There is only the choice that fits your purpose.
Make Basic Formatting and Design Decisions
Once you know your goal, start shaping the visual experience of your book. Think about your layout, your font choices, your chapter headings, and your spacing. Decide whether you want to include photos. If you include them, plan where they belong. Captions can help readers understand the context. Pay attention to your title page, dedication, acknowledgments, and author bio. These elements create a complete and professional final product.
Choose the Best Publishing Path
If you want physical copies without going through a large company, print on demand services are a simple and affordable option. They allow you to upload your manuscript and order as many or as few copies as you like. If you want to self publish widely, digital platforms make it possible to distribute your autobiography as both an ebook and a paperback. If you are pursuing traditional publishing, research small presses or literary agents who specialize in nonfiction or life stories.
Each path has its advantages. Print on demand is convenient and low risk. Self publishing gives you control. Traditional publishing offers industry support but takes more time.
Plan Your Promotion if Your Book Is Public
If your autobiography is meant for a broader audience, consider how you want to share it. A simple author website can introduce you to readers. Social media posts can highlight meaningful moments from your book. Speaking at community events or book clubs can also help you connect with the right readers. Promotion does not mean becoming someone you are not. It means opening a door for your story to reach the people who will appreciate it.
Linking This Step to Seven Step Models
Most seven step writing systems end with publishing because it gives your entire journey a sense of completion. After all the planning, drafting, revising, and polishing, this final step transforms your manuscript into a finished book. It is the answer to every writer who wonders what to include in an autobiography beyond the writing itself. Sharing the story is part of the process.
Common Challenges and How to Overcome Them
Every writer reaches a point where the process feels heavier than expected. Writing your life story is emotional, vulnerable, and sometimes confusing, so it is natural to run into challenges. The good news is that most of these challenges are predictable, and once you understand them, you can move through them with more confidence and less stress. This section is longer than 400 words so you can explore each challenge in depth and learn exactly how to navigate it.
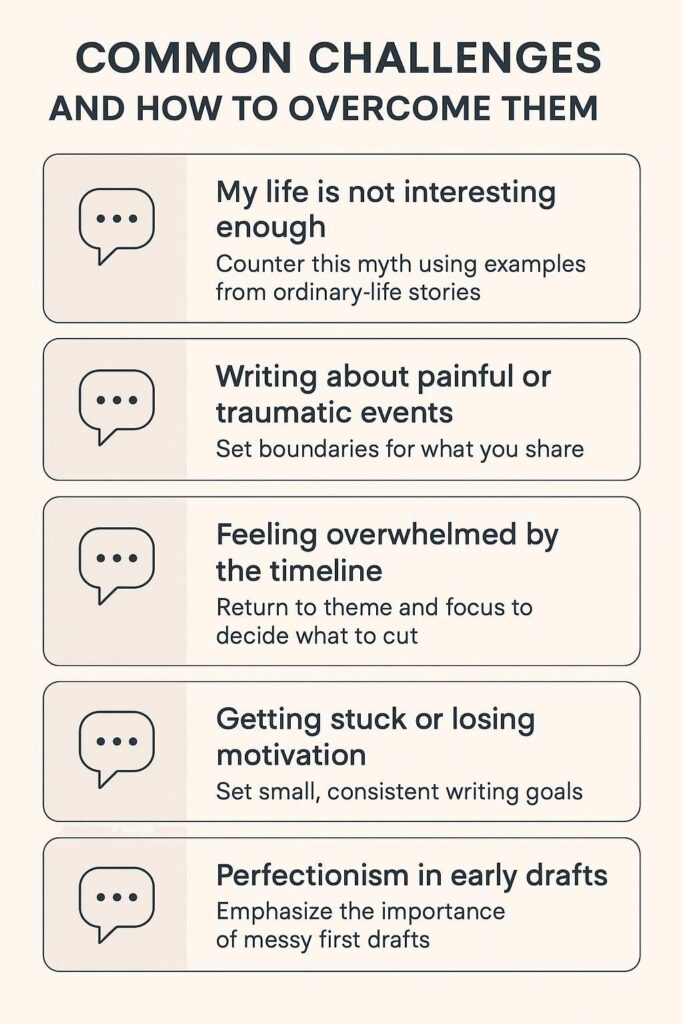
Challenge 1: Feeling Like Your Life Is Not Interesting Enough
This is the most common fear among first time writers. Many people believe their story is too ordinary to matter. The truth is that readers connect with honesty, not spectacle. Some of the most powerful autobiographies are written by people who lived quiet lives but experienced emotions and moments that resonate universally. Your struggles, friendships, losses, small victories, and private turning points can touch readers more deeply than you realize. Focus on meaning, not grandeur. When your story reflects truth, people feel it.
Challenge 2: Writing About Painful or Traumatic Events
Difficult memories can be emotionally draining to revisit. If writing about trauma feels overwhelming, take your time. You do not have to include everything, and you do not have to write in a single sitting. Work in stages. Set emotional boundaries. Use grounding techniques before and after writing. It can also help to talk to someone you trust while working through intense chapters. Remember that you are in control of what you share. You can be honest without exposing more than you are comfortable with.
Challenge 3: Feeling Overwhelmed by Your Timeline
Your life contains years of memories, and it is easy to feel lost in all the details. If you feel overwhelmed, return to your theme and your core message. Ask yourself which events directly support the story you are trying to tell. Not every memory belongs in the book. Your theme acts like a filter, helping you keep what matters and gently letting go of what does not. This makes your narrative stronger and keeps the reader engaged.
Challenge 4: Getting Stuck or Losing Motivation
There will be days when writing feels impossible. When this happens, shrink the task. Instead of writing a full chapter, write a single scene. If a scene feels too big, write a single paragraph. If that feels too heavy, write one sentence. Small, consistent progress builds real momentum. You can also revisit your purpose to remind yourself why this story matters. Visualizing the finished book can also reignite your motivation.
Challenge 5: Struggling With Perfectionism
Perfectionism is one of the biggest barriers in autobiography writing. Many writers try to edit while drafting, which stops the flow. Remember that your first draft is meant to be imperfect. It is a place to explore, experiment, and discover your story. The shaping comes later during revision. You do not need perfect sentences at this stage. You only need movement. The question of what to include in an autobiography becomes clearer once you have a complete draft to work with.
Why These Challenges Matter
Understanding these common obstacles prepares you emotionally and mentally for the writing journey. When you recognize a challenge as a normal part of the process, it loses its power. You become more patient with yourself, more committed to your story, and more confident in your ability to finish your autobiography.
Quick Reference: The 7 Steps at a Glance
You have covered a lot of ground, and by now you understand each step in detail. This section gives you a clean, simple snapshot of the entire process so you can see the structure in one place. Think of it as your pocket guide, something you can return to anytime you feel overwhelmed or unsure of what comes next. Many writers find that having this quick reference nearby helps them stay focused and confident as they move through the writing and revision stages.
1. Step 1: Understand the Form and Your Purpose
Begin by understanding what an autobiography is and why you are writing one. Clarify whether your book is meant for family, for personal reflection, or for a wider audience. Knowing your purpose shapes everything else you do.
2. Step 2: Choose Your Focus, Timeframe, and Big Takeaway
Decide what central theme ties your story together. Choose the timeframe that supports this theme. Define the message or insight you want readers to carry with them after reading your story.
3. Step 3: Brainstorm and Gather Raw Material
Collect all the pieces of your life story. Build a timeline. Look through old journals, photos, letters, and messages. Interview people who shared meaningful moments with you. Free write to uncover memories that live beneath the surface.
4. Step 4: Build Your Structure and Outline
Choose a structure that fits your story, whether chronological, thematic, or hybrid. Use the three part arc to shape your beginning, middle, and end. Turn your timeline into a clear outline that shows the flow of your chapters and scenes.
5. Step 5: Draft Your Autobiography Scene by Scene
Write your first draft without worrying about perfection. Create vivid scenes using description, emotion, and reflection. Focus on authenticity and momentum. Bring your experiences to life with storytelling craft.
6. Step 6: Revise, Edit, and Fact Check
Strengthen your story with big picture revisions. Check for accuracy, consistency, and pacing. Polish your writing line by line. Handle sensitive topics with care. Seek outside feedback to refine your manuscript.
7. Step 7: Decide How You Will Share or Publish It
Choose your publishing path. Make formatting and design decisions. Select the platform that matches your goals. If your book is for a wider audience, plan simple, meaningful ways to share it.
Why This Summary Helps
This quick reference brings the entire seven step system together in a neat, easy to follow list. It mirrors the structure used by leading writing resources and gives you a clear path from idea to finished book. Any time you feel stuck, return to this list to remind yourself where you are in the process and what comes next.
FAQs
1. What exactly is an autobiography, and how is it different from a memoir or a biography?
An autobiography is your full life story written by you.
A memoir covers a focused period or theme from your life.
A biography is your story written by someone else.
2. Do I need to be famous or old to write an autobiography?
No. Anyone can write an autobiography. Everyday stories often resonate more deeply than celebrity ones.
3. What are the 7 steps in writing an autobiography?
The seven steps are:
Understand the form and purpose.
Choose your focus and timeframe.
Gather raw material.
Build your structure and outline.
Draft scene by scene.
Revise and edit.
Decide how to publish or share it.
4. How long should an autobiography be?
Most autobiographies fall between 60000 and 90000 words, but shorter works of 20000 to 40000 words can also be effective depending on your purpose.
5. How do I start my autobiography if I feel stuck?
Start with a vivid moment instead of your birth. Any strong scene that captures emotion, change, or conflict can pull you into the story.
6. What if I cannot remember exact dates or details?
Use approximate time markers and note when you are estimating. Emotional truth matters more than perfect accuracy.
7. How do I handle writing about other people?
Be honest but respectful. Change names when needed and avoid harmful claims. Ask permission for sensitive material if possible.
8. Can I get professional help with my autobiography?
Yes. You can work with writing coaches, editors, or ghostwriters. Choose reputable providers and check their experience with life stories.
9. How do I know what to include and what to leave out?
Use your theme and message as your guide. Focus on events that support the story you are telling. This helps you decide what to include in an autobiography while keeping the narrative clear.
Conclusion
Writing your autobiography is one of the most meaningful projects you can take on. It invites you to slow down, look back, and understand the moments that shaped you. By following a clear seven step framework, you move from confusion to clarity and from scattered memories to a story with direction and purpose. You now know how to focus your narrative, gather the material that matters, build a strong structure, draft with confidence, revise with intention, and choose the best path for sharing your book.
The real power of an autobiography is not in having a perfect life story. It is in telling the truth about your journey in a way that feels honest and human. Your challenges, your growth, your small turning points, and your private victories all carry meaning that readers can feel. And if you ever need support, from trusted readers to professional editors or even experienced ghostwriters, help is always available.
Your story is yours to shape and yours to share. Take the next step with confidence. You now have the tools to bring your life to the page and create a book you can be proud of.