Want to write your autobiography but don’t know where to start? This heartfelt and practical guide walks you through every step, from finding your voice to choosing a structure, so you can tell your story with confidence and purpose.
Introduction
Every life has a story, and yours is worth telling. Maybe you want to leave something behind for your family, or maybe you just want to make sense of the winding road you have travelled. Whatever the reason, writing it down can feel overwhelming at first. The questions come quickly. Where do I start? What if my story is too ordinary? What if I cannot remember everything?
The truth is simple. Your voice matters. Your experiences carry meaning. You do not need to be a professional writer to capture them. You only need honesty and a willingness to begin. Writing your autobiography is less about perfect sentences and more about creating a record of who you are, for yourself and for others.
In this guide, you will learn how to write your own autobiography step by step. Together we will make it real, meaningful and completely possible.
Autobiography vs Memoir vs Autobiographical Novel
Before you begin, it helps to know what kind of book you are writing. Without that clarity, it is easy to drown in memories and lose direction. Let’s break it down.
Autobiography
An autobiography is the full sweep of your life, usually told in chronological order. It begins with your earliest years and runs all the way to the present moment. Think of it as the complete map, with all the turns, milestones, and crossroads. Many people choose this form when they want to leave behind a lasting record of their life for family, historians, or a wider audience.
Memoir
Memoir is narrower and more focused. Instead of trying to cover everything, it dives deep into one theme, one period, or one defining chapter. It could be the years you spent working abroad, your journey through illness and recovery, or the search for identity across cultures. Memoir’s strength lies in its intimacy. It says, Here is one truth that shaped me.
Autobiographical Novel
An autobiographical novel gives you creative freedom. It is based on your experiences but shaped with fiction. You can alter names, bend timelines, or heighten emotion. The facts may blur, but the emotional truth shines. This format is ideal if you want to explore your story with more imagination and less restriction.
Choosing What Fits You
The right format depends on your purpose. Do you want to capture the entire arc of your life? Choose autobiography. Do you want to reveal one raw and unforgettable theme? Choose memoir. Do you want to tell your truth through the lens of storytelling? Choose autobiographical novel.
And if you are still unsure, you do not have to walk alone. Many writers turn to autobiography writing services for support with structure, editing, or even co-writing. But whether you go solo or get help, what matters most is that your story is told in the way that feels most authentic to you.
Define Your Purpose and Audience
Before you write a single sentence, pause. Ask yourself: Why am I doing this? Who am I writing for? The answers will shape everything that follows, from your tone to the stories you choose to include.
Why Are You Writing?
Some people write to leave a legacy for their family. They want children, grandchildren, and even generations not yet born to know their struggles and their joys. Others write to heal, to finally put into words what has been locked inside for years. For some, it is simply creative expression, a way of shaping life into art.
None of these reasons is better than another. What matters is honesty. If your purpose is clear, the writing becomes more focused. Without purpose, the story can drift, and you may lose momentum. With purpose, every page feels like it belongs.
Who Are You Writing For?
Your audience matters as much as your reason. Think about who will read your words. Is it just for your family, tucked into a drawer or printed in a small batch of copies? Is it for the public, shared widely on shelves or online? Or is it for yourself, a private act of remembering?
Each audience changes how you tell the story. If you are writing for family, you might include smaller, intimate details; how your father brewed tea, how your grandmother sang as she worked. If you are writing for the public, you might focus on universal themes like perseverance, migration, love, or resilience.
The key is this: your audience shapes your voice. Imagine speaking directly to them. That imagined conversation will guide the tone, depth, and language of your writing.
Purpose + Audience = Direction
When you combine purpose and audience, you find your compass. If your purpose is legacy and your audience is family, you will write with tenderness and detail. If your purpose is healing and your audience is yourself, you may write with brutal honesty and raw emotion. If your purpose is to inspire and your audience is the wider world, you will shape your story into themes that others can connect to.
Before you get lost in chapters and timelines, sit with these two questions. Why are you writing? Who are you writing for? The clarity will carry you through every chapter of writing your autobiography.
Decide the Focus and Structure
Here is the truth: you cannot fit every detail of your life into one book. If you try, you will end up with a messy list instead of a living story. The secret is focus. Decide what matters most, and build your structure around it.
Choose a Central Theme
Think of your life as a river. Many tributaries flow into it, but one current carries you forward. That current is your theme. It could be perseverance, redemption, love, identity, migration, or survival. Ask yourself, What idea ties my story together? What do I want people to feel when they close the last page?
Without a theme, an autobiography can feel like a box of scattered photographs. With a theme, it becomes a gallery where every picture has a place.
Pick a Structure That Serves the Story
Once you have your theme, you need a structure. Here are three that work beautifully:
- Chronological: The classic approach. You start at the beginning and move forward through time. It is clean and easy to follow, especially if you want a full-life autobiography.
- Thematic: Instead of time, you organize by subjects. For example, chapters on love, work, faith, and travel. Each theme becomes a window into your life.
- Anecdotal: You tell your life through vivid, standalone stories. Each scene captures a turning point or a lesson, and together they form the whole.
Whichever you choose, remember that structure is not a cage. You can use flashbacks, foreshadowing, or story arcs to add rhythm. Your life is not a straight line, and your book doesn’t have to be either.
Focus Brings Freedom
Here is the paradox: the more you narrow your focus, the more powerful your writing becomes. When you try to say everything, you say nothing. When you choose, you give your story clarity and strength.
If you feel overwhelmed about how to begin, remind yourself that the real question is not how to write everything but how to write your own autobiography in a way that captures truth without drowning in detail. That shift in thinking will keep you steady as you write.
Gather Your Materials
Memory is slippery. You think you will never forget certain moments, but time has a way of blurring the edges. That is why gathering your materials before you dive into writing is so important. It gives you anchors, images, and fragments to build your story on. Think of it like collecting stones to build the foundation of a house. Without them, the structure wobbles. With them, it stands strong.
Memory Aids That Matter
Start with what you already have. Old photographs are powerful triggers. A faded picture of a birthday party can bring back not just the cake and candles but the voices, the songs, even the smell of the room. Letters, journals, postcards, or emails can do the same. They capture the way you thought and felt in a specific moment.
Conversations are another goldmine. Sit down with siblings, cousins, old friends, or even your children. Ask them about what they remember. Often, their version of events will surprise you. They may recall details you had buried, or see moments from a perspective you never noticed. These exchanges not only spark memory but can deepen your understanding of the people in your life.
Build a Timeline
Once you have your materials, sketch a timeline. It does not need to be perfect or complete. Write down the big events first: schools, moves, jobs, relationships, births, losses. Then add the smaller turning points; the unexpected encounters, the decisions that changed everything, the times you felt most alive or most broken.
Your timeline becomes a map. It helps you see the arc of your life, the rise and fall, the repeating themes. Later, when you begin writing, you can decide which parts to highlight and which to leave in the background.
Highlight Turning Points
Not every detail of your life needs to be included. What matters are the turning points; the moments when something shifted. Maybe it was leaving home for the first time, surviving an illness, falling in love, or standing up for yourself when it was hardest. These are the beats of your story. They carry emotional weight, and readers connect to them because they recognize change in their own lives too.
Tools That Can Help
Technology can make this process easier. Apps like Notion or Scrivener help you organize your notes and timelines. Voice recorders or transcription tools like Otter.ai allow you to capture memories on the go. Digital boards like Milanote can help you map out story arcs visually. If all of this feels overwhelming, remember that professional help exists. Many people use autobiography writing services to organize material, draw out hidden stories, or shape raw memories into a coherent structure.
Your Story Chest
Think of gathering your materials as creating a story chest. You are filling it with objects, words, and memories that matter. Once it is full, you will not sit down to a blank page. You will sit down with treasure. From that chest, the writing will flow more easily, because you will not be inventing, you will be remembering.
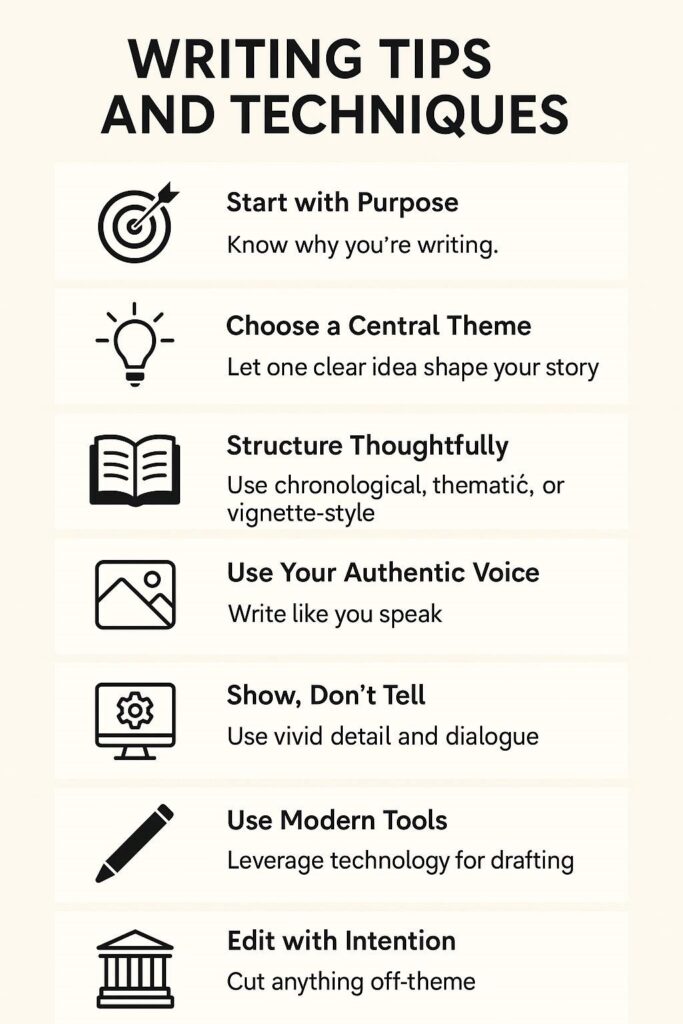
Writing Tips and Techniques
So you have your purpose, audience, structure, and a chest full of memories. Now comes the hard part: turning all of that into words on a page. Writing feels intimidating at first, but with the right techniques, it becomes less of a mountain and more of a series of manageable steps.
This section will give you practical strategies you can follow, even if you have never written anything longer than a letter.
1. Start with Purpose
Before you write a scene, remind yourself why you are writing. Is it to preserve a legacy? To inspire? To make sense of your past? Your purpose will guide tone, detail, and honesty. A legacy piece might focus more on clarity and detail, while a healing piece might lean into emotion and vulnerability. Keeping your purpose in mind prevents your writing from becoming scattered.
2. Choose a Central Theme
Think of your story as a thread that runs through a necklace of beads. Each bead is a scene, a memory, or a chapter. The thread; your theme, holds them together. Without it, the necklace falls apart.
Themes could be transformation, belonging, survival, migration, or creativity. Write your theme at the top of your notes and check back often: Does this scene connect to my theme? If it does not, consider setting it aside.
3. Structure Thoughtfully
Beginners often try to write everything in chronological order. That is a good starting point, but it is not the only option. Here are three structures to consider:
- Chronological: Simple and clear. Start with your childhood and move forward. Great for a full-life autobiography.
- Thematic: Organize chapters around subjects like love, work, identity, or resilience. Best when your life contains strong recurring ideas.
- Vignette Style: Short, self-contained stories that together form the whole. Perfect if you prefer to write in bursts rather than long continuous chapters.
You can also mix styles. For example, a chronological backbone with thematic chapters that dive deeper into specific areas.
4. Use Your Authentic Voice
Do not try to sound like a “literary author.” Write as you speak. If your natural style is direct, be direct. If it is gentle, be gentle. Authenticity builds connection. Readers care less about polished grammar and more about honesty.
A practical trick: record yourself telling a story out loud. Transcribe it, then shape it into written form. This keeps your voice alive on the page.
5. Show, Don’t Tell
Instead of saying I was scared, show the scene: My hands shook as I reached for the door handle. Specific detail creates images, and images create emotion.
- Use sensory detail: What did it smell like? Sound like? Feel like?
- Use dialogue: Let people speak for themselves. “Don’t go,” my mother whispered, says more than a paragraph of explanation.
- Use setting: Place your reader in the room, on the street, or in the hospital corridor.
Scenes beat summaries every time.
6. Use Modern Tools
Technology can make writing less overwhelming.
- Scrivener or Notion: For organizing timelines, chapters, and notes.
- Otter.ai: For recording and transcribing memories or interviews.
- Milanote or Campfire: For mapping out emotional arcs and visual storyboards.
- Canva: For designing cover pages, family trees, or chapter inserts.
Experiment, but do not overcomplicate. Use what helps you move forward.
7. Edit with Intention
Your first draft is not supposed to be perfect. Write freely, then come back with an editor’s eye. Ask:
- Does this scene serve my theme?
- Is this detail necessary, or does it slow the story?
- Have I shown emotion, or am I hiding behind facts?
Reading aloud helps you catch awkward pacing or missing feeling. Do not be afraid to cut what does not belong. Less can often be more.
8. Add Cultural and Historical Context
Your story does not exist in isolation. Place it in time. Mention the music that was playing, the political climate, the neighborhood as it was. These touches do not just inform, they immerse. Readers understand your world better when they can see the backdrop.
9. Use Inner Voice
Your thoughts are as important as your actions. Let readers hear what you were telling yourself in key moments. It shows growth, doubt, and humanity. For example: I told everyone I was fine, but inside I was already planning my escape.
10. Do Not Worry About Gaps
No one remembers everything. Write what you can, clearly and honestly. If you must approximate, admit it. I do not remember the exact words, but the silence that followed still weighs on me. That honesty is stronger than false precision.
The Beginner’s Compass
If you feel lost, return to three basics: purpose, theme, and voice. They will always bring you back on track. Writing is not about speed or perfection. It is about persistence. Start with one scene, one page, one memory. Step by step, they will grow into chapters. Chapters will grow into a book.
And that is the essence of how to write your own autobiography: begin small, stay honest, and let your story take shape piece by piece.
Edit, Revise, and Polish
Writing your first draft feels like climbing a mountain. Reaching the top is an achievement in itself. But the truth is, your work is only half done. Editing and revision are where your story becomes sharp, clear, and emotionally powerful.
Think of it this way: the first draft is you telling yourself the story. The second, third, and even fourth drafts are where you shape it so others can feel it too.
Step One: Take Distance
When you finish your draft, put it away for a short time. A few days, a week, even a month if you can bear it. This break gives you fresh eyes. When you return, you will see what is strong and what feels weak. Distance turns you from writer into editor.
Step Two: Big Picture Edits
Start with the structure, not the sentences. Ask yourself:
- Does the story flow in a way that makes sense?
- Are the chapters balanced, or does one section drag while another feels rushed?
- Does every scene serve the main theme, or are there tangents that distract?
This is the stage for cutting, moving, and rewriting. It may feel painful to delete stories you worked hard on, but remember: trimming gives your main story more power.
Step Three: Deepen Emotion
Go back through your key scenes. Are you showing enough emotion? Or have you hidden behind facts? Add sensory details, inner voice, or dialogue to bring those scenes to life. Readers connect to vulnerability, not perfection.
A good test is to read your draft aloud. If your voice catches, you are close to the truth. If you feel nothing, the scene may need more work.
Step Four: Language and Clarity
Now zoom in to the sentence level. Watch for long, complicated lines that could be made simple. Replace vague words with specific ones. Cut clichés. Your goal is not fancy writing. It is clarity.
Short sentences create impact. Long sentences slow the rhythm. Use both, but use them with intention.
Step Five: Feedback
When you have revised on your own, consider sharing your draft with trusted readers. Ask them not just what they liked, but where they felt confused or bored. If you want more objectivity, hiring a professional editor can be invaluable. They can spot patterns you miss and suggest ways to improve flow and pacing.
Step Six: Balance Truth and Compassion
When you write about others, your truth may clash with their privacy. You do not need to silence yourself, but you can write with care. Ask yourself: Is this detail necessary for the story? Can I tell it honestly without causing unnecessary harm?
The Final Polish
Editing is not about stripping away your voice. It is about letting it shine through more clearly. Be patient with the process. Every pass through your draft will bring you closer to the book you want.
Remember, writing your autobiography is not only about putting words on paper. It is also about shaping them until they reflect the heart of your journey. Editing is where your story becomes not just remembered, but unforgettable.
If you are looking to hire top autobiography ghostwriters, feel free to get in touch.
Finalize and Preserve Your Work
Finishing your draft is a milestone, but your journey is not over yet. Now comes the stage of making sure your autobiography is ready to be shared, saved, and preserved for the future. This part matters because a story that lives only on a laptop or in loose pages can easily be lost. A story that is properly finalized can live for generations.
Choose Your Publishing Path
There are many ways to share your work.Self-publishing: Platforms like Amazon Kindle Direct Publishing or IngramSpark let you print on demand. This is a good choice if you want to make your book available to the public.
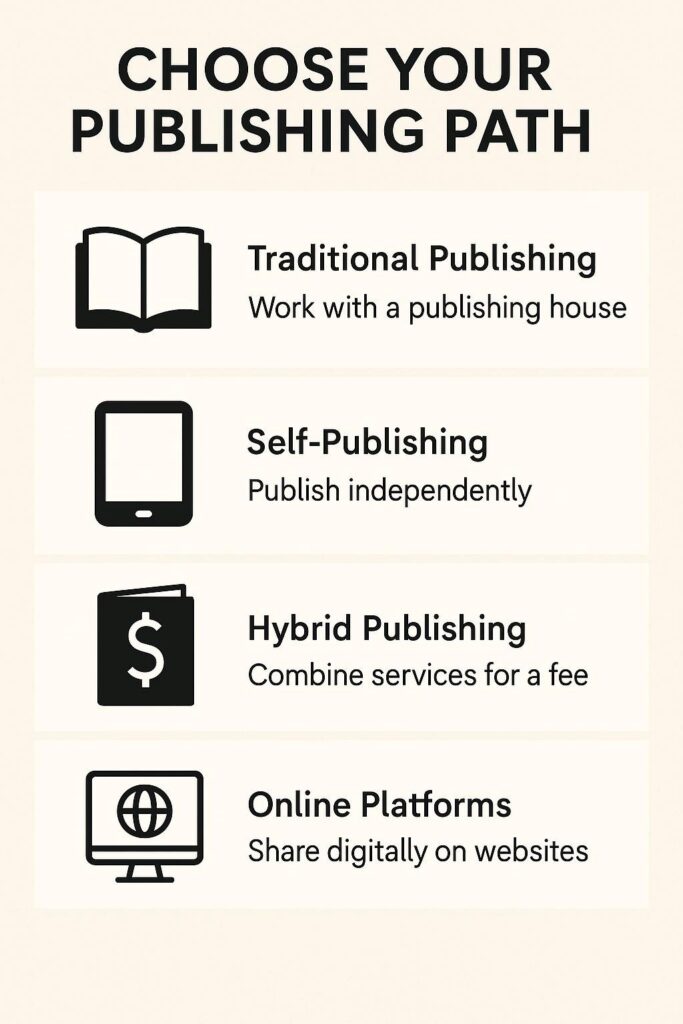
- Private printing: If your audience is only family and close friends, you can create a small batch of beautifully printed books through local printers or online services.
- Digital sharing: Some writers simply create a PDF or e-book and share it privately. This is simple and cost effective.
Your purpose and audience should guide your choice. A family legacy project may not need wide distribution, while a book meant to inspire others might benefit from a larger platform.
Design Matters
A book is not just words. The design affects how people experience it. Adding photos, scanned letters, or family trees can make your story richer. Choosing clear fonts and thoughtful layouts makes your book easier to read. Even something as simple as a striking cover can turn your autobiography into a keepsake.
If design feels daunting, there are templates and tools like Canva, Vellum, or Adobe InDesign. For a more polished look, consider working with a designer.
Back It Up
Technology fails. Hard drives crash. Files get lost. Protect your work by saving it in more than one place. Keep a digital copy on your computer, a copy in cloud storage, and another on an external drive. Print a copy as well. The effort you put into preserving your story deserves protection.
The Reward of Preservation
When you finish this step, you will have something that is both book and legacy. A tangible record of your life, carefully shaped and safeguarded. That is why learning how to write your own autobiography is about more than writing. It is also about making sure your story is not forgotten.
Frequently Asked Questions
Q: How do I start my autobiography if I feel stuck?
Start anywhere. Begin with a vivid memory, a conversation that changed you, or a turning point in your life. Do not worry about order yet. Structure can come later. The important thing is to get words on the page.
Q: Can I write my autobiography even if I am not a “writer”?
Yes. Many of the most powerful autobiographies come from people who never thought of themselves as writers. Grammar and polish can be fixed later. What matters is your truth, your voice, and your story.
Q: What if I can’t recall events perfectly?
Use tools to spark your memory. Photos, journals, or conversations with family can help. And if some moments remain unclear, write them as you remember and be transparent. Readers appreciate honesty. A line like, I cannot recall the exact words, but I remember the weight of silence is far stronger than forcing accuracy.
Q: Should I include painful or private moments in my autobiography?
Only if you are ready. Vulnerability gives your story power, but your well-being comes first. Some moments may need distance before they are written. Ask yourself: Is sharing this helpful for me or my reader? If the answer is yes, include it with care.
Q: What is the difference between autobiography and memoir?
An autobiography usually covers your whole life, from birth to the present. A memoir focuses on one theme, period, or idea. Both are valid. The choice depends on your purpose and audience.
Q: What tools can I use to make writing my autobiography easier?
Organizing apps like Scrivener or Notion can help you keep track of timelines and chapters. Otter.ai is useful for recording and transcribing spoken memories. Canva is great for adding design elements like family trees. Use the tools that reduce stress, not add to it.
Conclusion
Writing your autobiography is more than a project. It is a gift. To yourself, to your family, and to anyone who may one day hold your book in their hands. You do not need to be a professional writer. You only need honesty, patience, and the courage to begin. Each memory, each scene, each truth you put on the page builds a legacy that lasts beyond you. So take the first step. Open a notebook or a blank document. Your story is waiting, and it deserves to be told.