How to Publish on Amazon Detailed, Step By Step Guide (With Pictures)
If you’ve been searching for how to publish a book on Amazon, this is the guide you need. It covers every part of the process with clear visuals and plain language.
This tutorial walks you through Amazon’s Kindle Direct Publishing platform, also known as KDP, and explains everything step by step on how to get your book listed on Amazon. From account setup to uploading your manuscript and hitting publish, every screen is shown and explained. If you want to publish your book on Amazon KDP, you’ve come to the right place.
Whether you’re releasing a novel, memoir, journal, or workbook, this guide removes confusion and helps you on how to publish your book easily on Amazon KDP for beginners. It’s ideal for first-time authors and even helpful for experienced ones who want to double-check the latest publishing flow and how to get their book published on Amazon.
Let’s begin.
Step 1: Author’s Verification Section
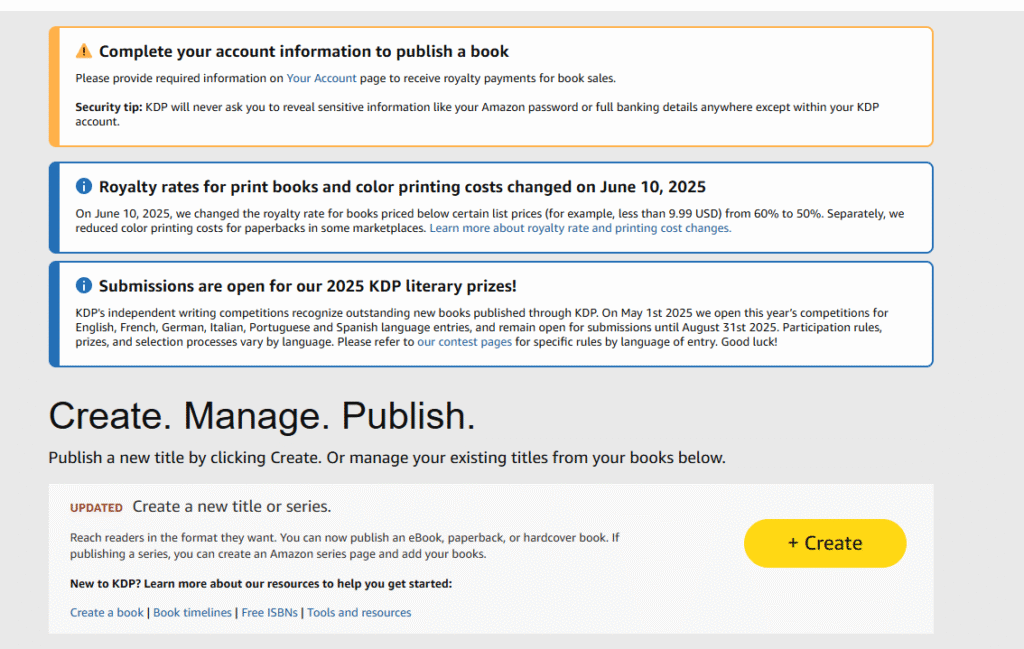
Head over to Amazon KDP’s website and sign in with your Amazon account. If you don’t already have one, create a new Amazon account and return to this page.
Once logged in, you’ll arrive at the KDP Bookshelf. This is your main dashboard for managing all your books.
This is what it should look like:
At this point, you may see a notice asking you to complete your account information. That’s necessary before publishing, so click on the relevant link or alert to begin your setup.
Click on “Your account.” Once done, it will ask you for Two-Factor authentication to verify it’s you and ask for your phone number. Put it in. Amazon will send you a code. Insert it here and proceed.
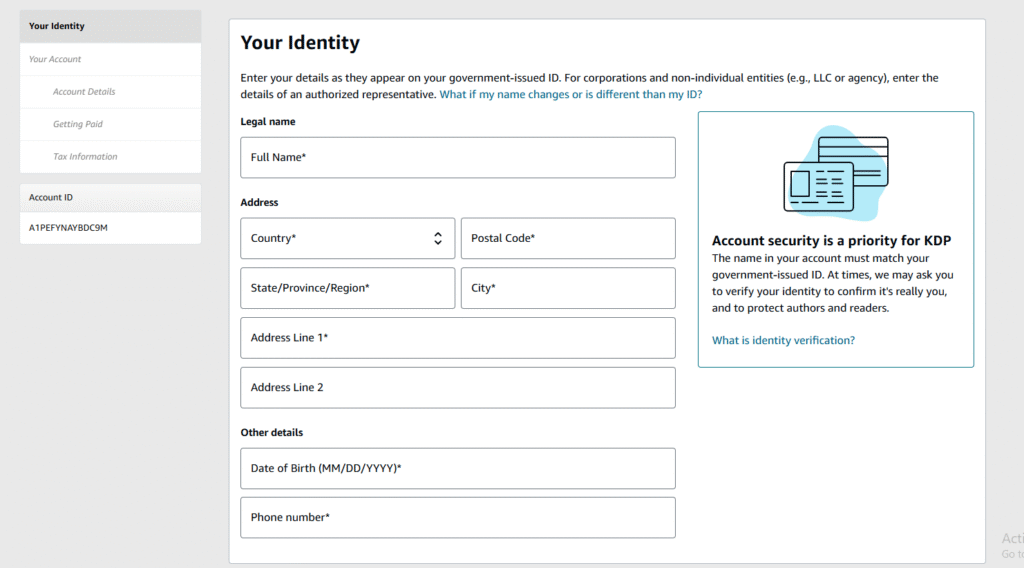
KDP will ask for your personal details exactly as they appear on your government-issued ID. If you’re publishing under a company name, this should be the name and ID of the authorized representative.
You’ll be asked for the following:
Full legal name
Country and postal code
State or region and city
Complete address
Date of birth
Phone number
Account security is a priority for Amazon KDP, so make sure everything matches your ID to avoid issues with verification or payouts later.
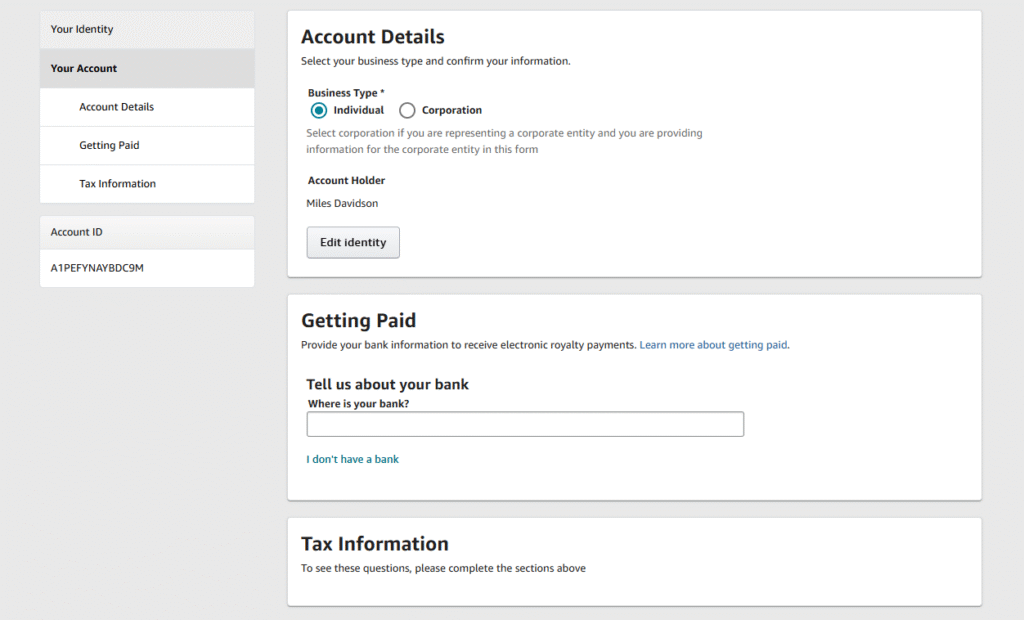
Now you’ll choose if you are publishing as an individual or a corporation. Most first-time authors select individual, unless they are publishing under a registered business entity.
You’ll also see your account holder’s name here, based on the identity information you just entered.
Next, you need to enter your banking details so Amazon can send your royalty payments.
If you don’t have a bank account yet, KDP offers the option to proceed later. However, you must complete this before receiving any payments.
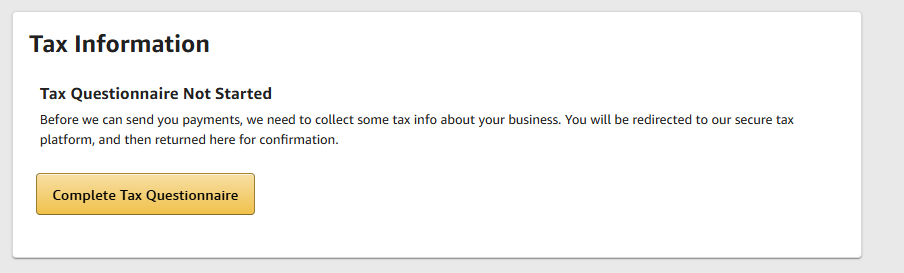
Complete Your Amazon KDP Tax Information – Important Before you can Publish Your Book on Amazon KDP
To receive royalty payments from a published book on Amazon KDP, Amazon requires every publisher to complete a tax questionnaire. This ensures compliance with IRS regulations and determines your withholding rate, especially if you’re publishing outside the United States.
Click the yellow button to begin.
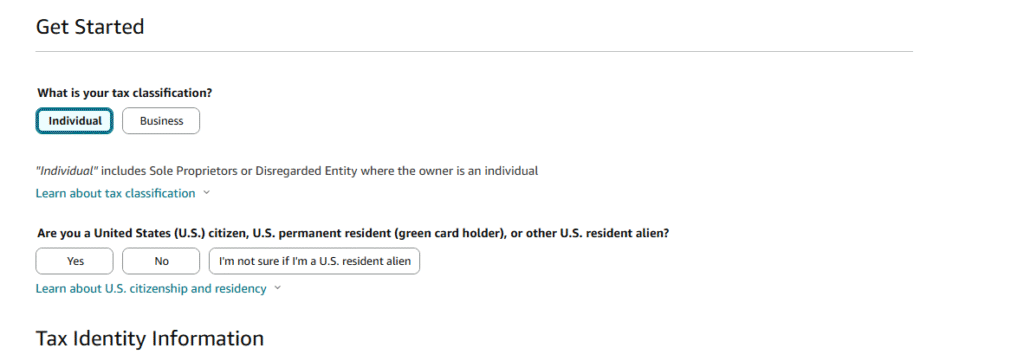
The first part of the form asks for your tax classification. Most authors will choose Individual, unless you’re publishing through a company with a separate tax identity.
Next, it asks whether you’re a U.S. citizen, U.S. resident, or a non-resident. This determines which tax treaty rules apply to your account.
Choose the correct option based on your legal and tax residency.
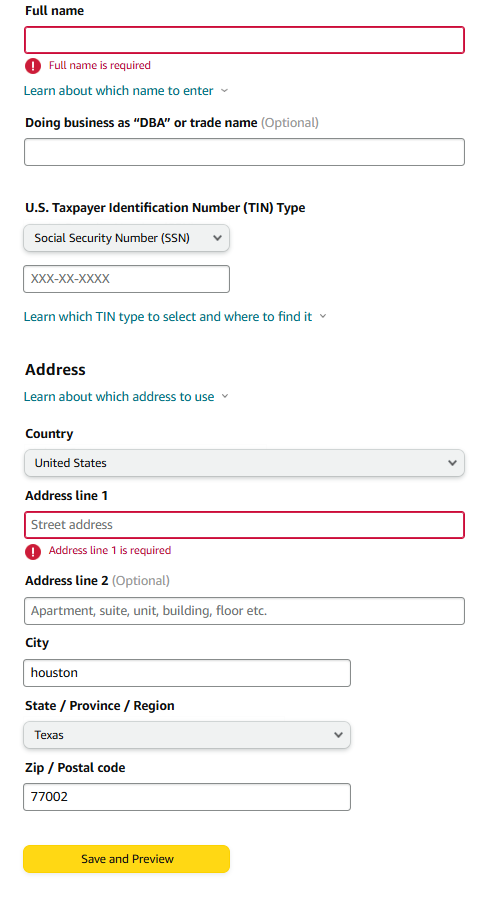
Now, you’ll provide personal tax information, including:
Full legal name
Optional trade name (if applicable)
U.S. Taxpayer ID (SSN, EIN, or ITIN)
Full address, including city, state, and postal code
If you’re outside the U.S. and don’t have a U.S. tax number, Amazon KDP allows you to proceed as a non-U.S. person and submit a W-8BEN form digitally.
Once everything is filled, click Save and Preview to proceed. You’ll be asked to review the summary and provide a digital signature before submitting. The digital signature requires you to just write your full name in the signature section, and that’s it! You’re done. Just three more steps to go.
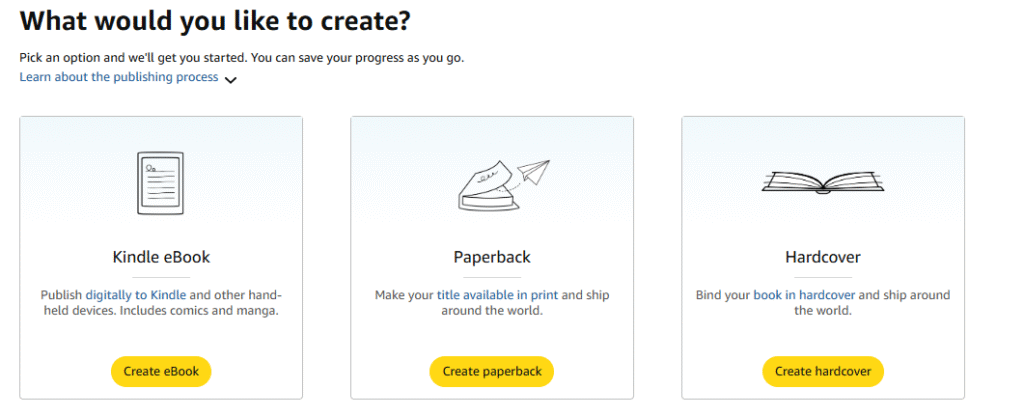
Step 2: Enter Your Book’s Information For KDP Author Verification – Pre-Publishing
After setting up your account, it’s time to publish your book. You’ll begin by selecting the format, eBook, paperback, or hardcover.
For this blog, we will show you how to do a paperback, as other versions are simpler to do.
Click Create Paperback (or your preferred format) to continue to the Book Details page.
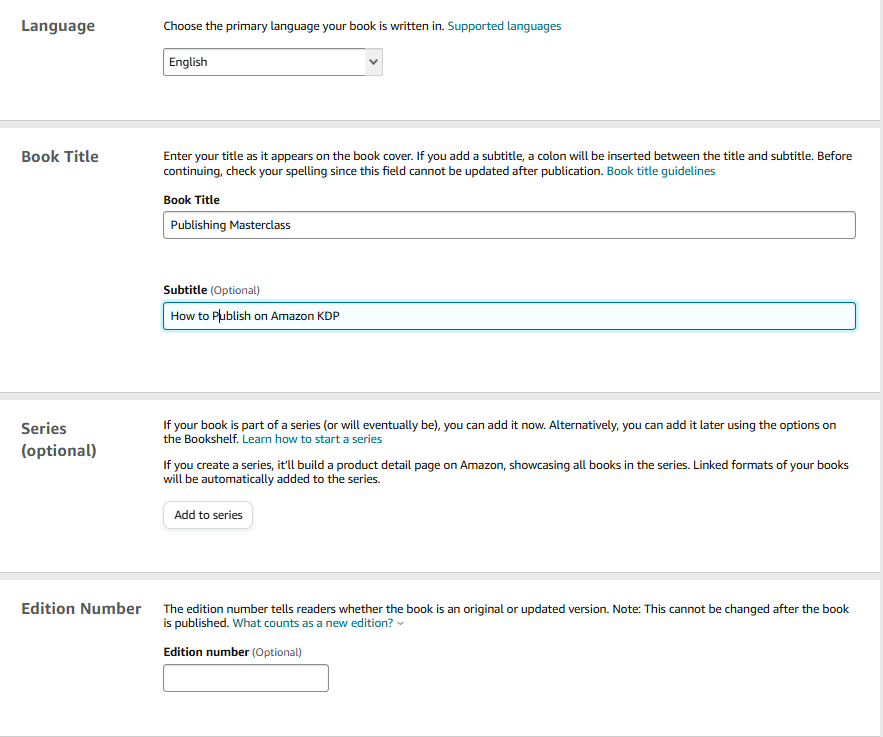
Book Title, Subtitle, and Series Info
Start by choosing the primary language of your book. Then, enter your book title exactly as it appears on your cover. You can optionally add a subtitle, assign it to a series, or include an edition number if it’s a revised version. Make sure to double-check your title; the first letter of every word should be in Capital Letters.
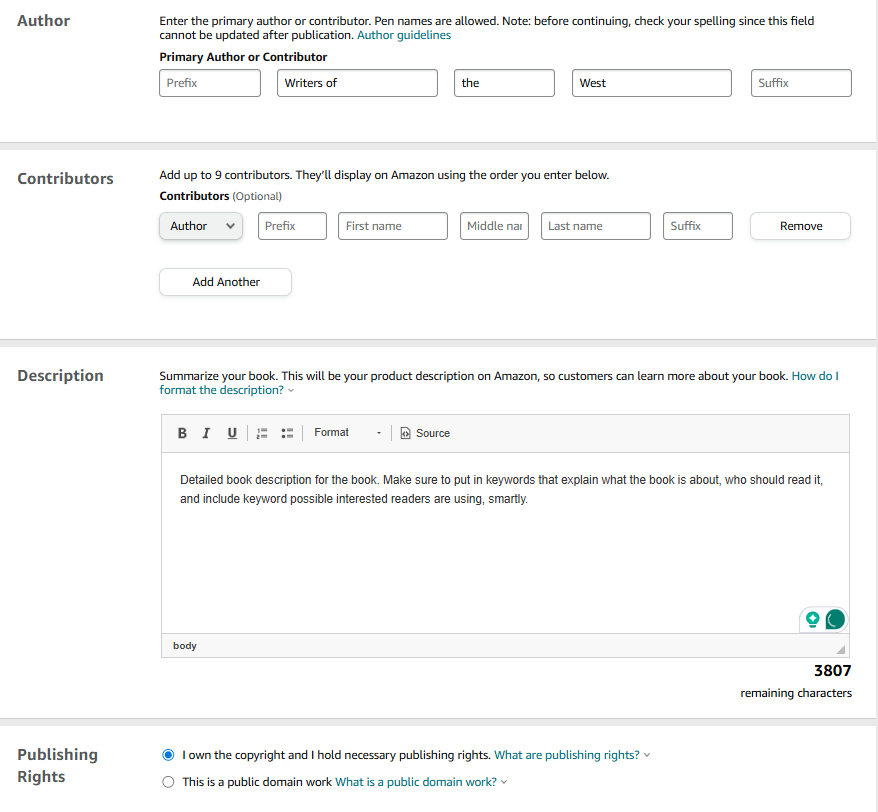
Add Author Name, Contributors, and Description
Enter your author or pen name in the Author section. You can also add up to 9 contributors, such as co-authors, editors, or illustrators.
Next, write a compelling book description that highlights what your book is about and who it’s for.
This is your product description on the Amazon listing; use keywords wisely. If you’re struggling, get a Professional Amazon KDP Publisher to do it for you. This section can make or break your book; make sure to add keywords that active readers might be searching for, who would possibly be interested in your book, and add NLP keywords as well so it ranks higher in Amazon’s search engines.
In the Publishing rights section, if you own the rights to your book, check option A, and if you are publishing an edited authorized version of someone else’s book, use option B.
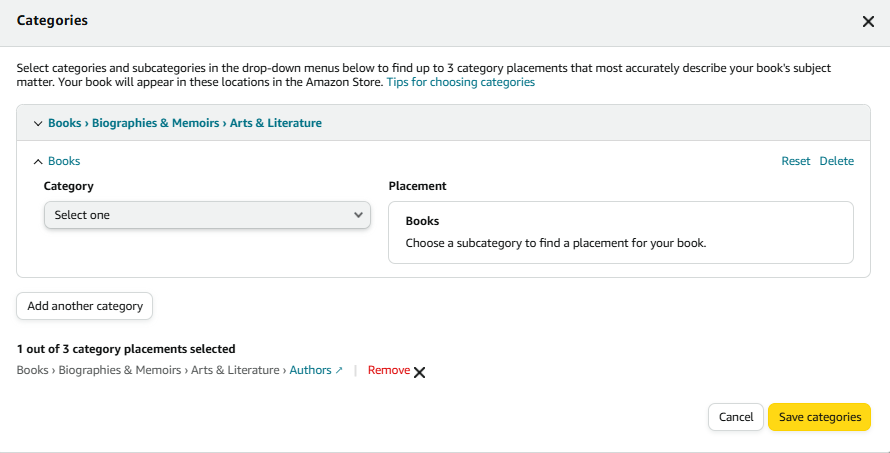
Select Categories for Your Book
You can choose up to 3 categories to help Amazon place your book in the right sections of the store. Choose the ones that best reflect your content, fiction, nonfiction, how-to, memoir, etc.
Note: Do not choose vague categories; your book will not rank. For example, listing your book as an African-American biography will rank your book on the 20th thousand page on Amazon; i.e, no one will ever see it. Rather, try to rank it for specific topics that seem deeper under the sub-categories; the less popular, the higher the chances of your book ranking higher. We also offer Self-publishing servicesif you get stuck.
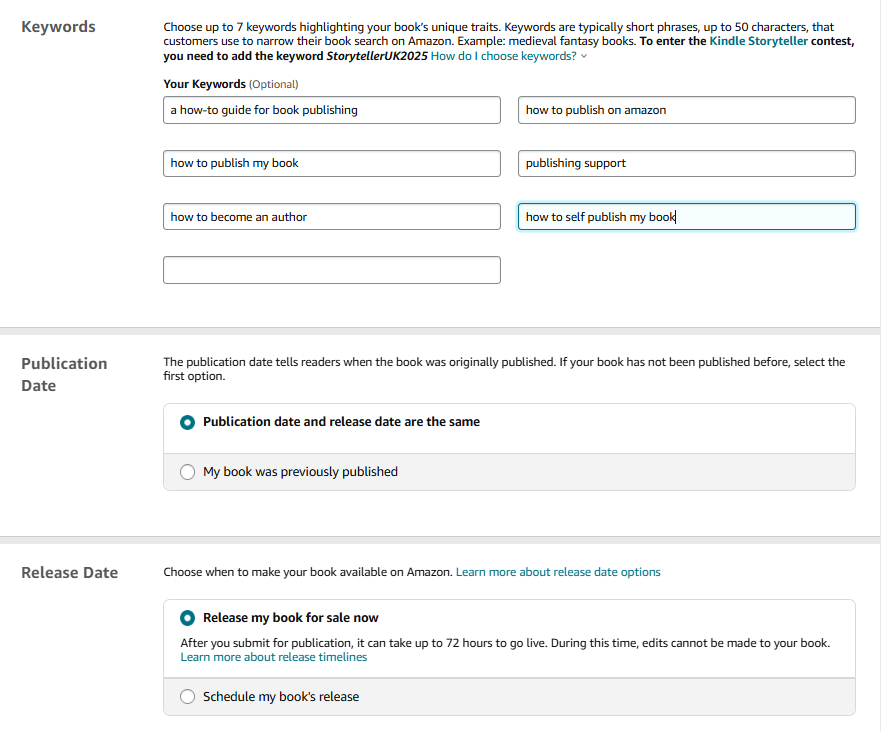
Add Keywords and Set Publication Settings
Now enter up to seven keywords or search phrases to help people discover your book. Make sure you don’t enter the title of other books, movies, or songs, as that will create a brand-copyright issue. You’ll also set your publication date and decide whether to release the book immediately or schedule it for later. You can decide if you want to release your book now or set it up for pre-order. In case of pre-order, make sure to upload your actual file 3 days before the release date.
Click Next, and we will proceed to the next section.
Step 3: Upload Your Manuscript and Book Files
Now that your book details are complete, it’s time to upload your actual content. This is where you’ll upload your formatted manuscript, your cover, and finalize technical print settings.
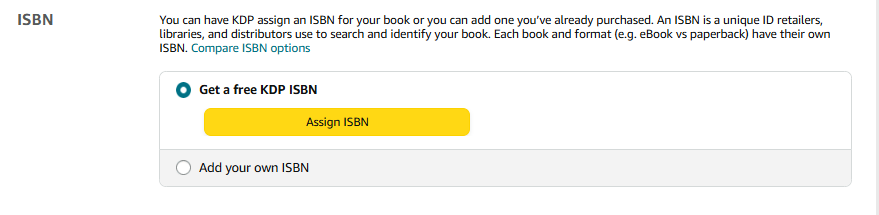
Assign an ISBN for Your Book
Amazon KDP offers the option to obtain a free ISBN or use one you’ve already purchased elsewhere. Each version of your book (paperback, hardcover, eBook) needs a unique ISBN.
If you get your free ISBN from Amazon, the book’s page on Amazon will show the publisher as “Independently published,” whereas if you get one from Bowker, the official place for U.S.-based authors to buy ISBNs, then you can get one from there and apply it here. In this case, the book will be published under your name, as the publisher.
If you have big plans for your book and are also looking forward to getting accepted by a traditional publisher and/or entering bookstore shelves, then getting an ISBN from Bowker is better, as it’s a universally identified number rather than an Amazon-specific ISBN that is only good for their platform.
If you need your own ISBN, depending on where you are from, review the chart below.
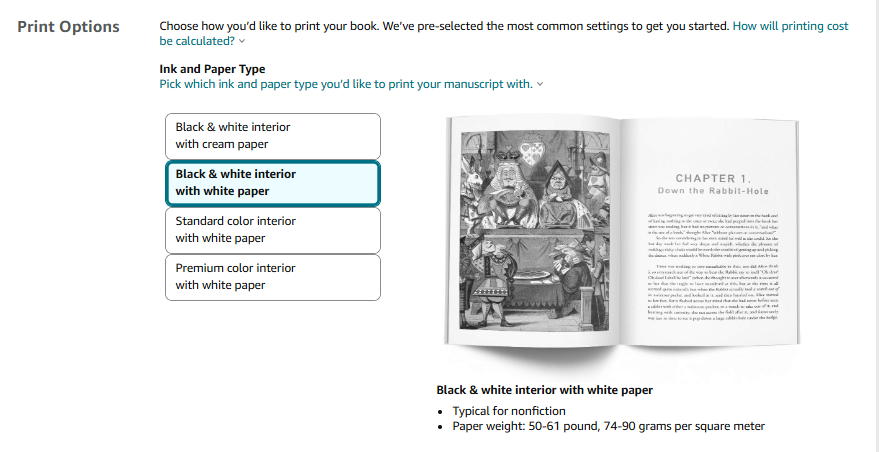
Choose Page Color and Paper Type
Now decide how your book’s interior should look. We’ll help.
This section determines the look and feel of your book’s interior pages. The choice you make affects your reader’s experience, the printing cost, and even how your book is perceived.
You’ll have four main options:
Black & white interior with cream paper
Ideal for novels, memoirs, or literary fiction
Cream paper is slightly off-white, giving a warmer, more traditional reading experience
Easier on the eyes for extended reading
Preferred by readers of fiction or books with long passages of text
Commonly used for novels targeting an adult audience
Black & white interior with white paper
Best for nonfiction, business, self-help, workbooks, and text-heavy guides
White paper provides strong contrast, which helps with readability for charts, headers, bullet points, and tables
Looks clean and professional, the most widely used format for informative or instructional books
Standard color interior with white paper
Ideal for books that have light color usage, like children’s books, recipe books with simple images, or illustrated guides
More affordable than premium color but not suitable for detailed photo work
Suitable if your images are not color-critical and your budget is tight
Premium color interior with white paper
High-quality color reproduction; best for photography books, high-end cookbooks, design portfolios, and children’s books with rich illustrations
Higher printing cost, but excellent visual impact
Use this only when color accuracy and vibrancy are crucial to your book’s value
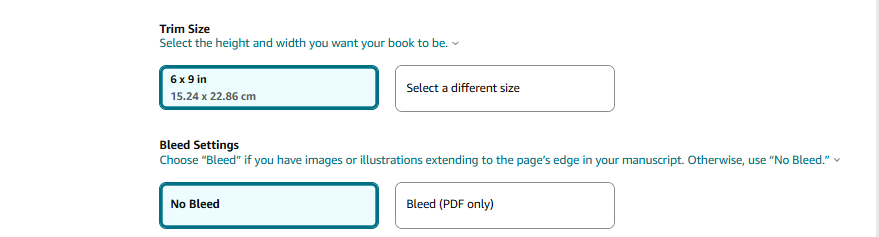
Select Trim Size for Your Book
Trim size refers to the physical dimensions of your book. The default is 6 x 9 inches, which is ideal for most paperbacks, but looks slightly bigger. We suggest 5.5 x 8.5 as a standard size. You can choose from many sizes depending on your book’s content and genre.
Trim size refers to the final physical dimensions of your printed book, how tall and wide each page will be after it’s cut.
Amazon KDP offers multiple trim sizes, but your decision should be guided by your genre, layout style, and reader expectations.
6 x 9 inches (15.24 x 22.86 cm)
This is KDP’s default trim size and most popular overall
Commonly used for self-help, nonfiction, and business books
Looks professional but can feel slightly larger in the hand compared to traditionally published paperbacks
Great if you want a “manual” feel or expect your readers to take notes inside
5.5 x 8.5 inches (13.97 x 21.59 cm) – Recommended Standard
Slightly smaller than 6 x 9, and closer to traditional trade paperback size
Ideal for novels, memoirs, biographies, and books with continuous reading flow
Feels more balanced, compact, and “store-bought” in terms of dimensions
Our suggestion for a clean, minimal, and versatile paperback size
Other Options
5 x 8 inches: Great for pocket-size books or short reads
7 x 10 inches: Best for workbooks, journals, or content with large graphics
8.5 x 11 inches: Common for textbooks, manuals, or content-heavy guides with illustrations and charts
Tip: The smaller the trim size, the more pages your manuscript will result in, which can affect printing cost and thickness.
What Is Bleed, and Should You Use It?
Bleed just means whether your images or background colors go all the way to the edge of the page or not.
No Bleed (recommended for most books): Use this if your book is mostly text, or if your images stay inside the page and don’t touch the edges. This is what most authors should choose.
Bleed: Use this only if your images or designs reach the edge of the page, like in children’s books, coloring books, or anything with full-page visuals.
If you’re not sure, choose No Bleed, you can always change it later.
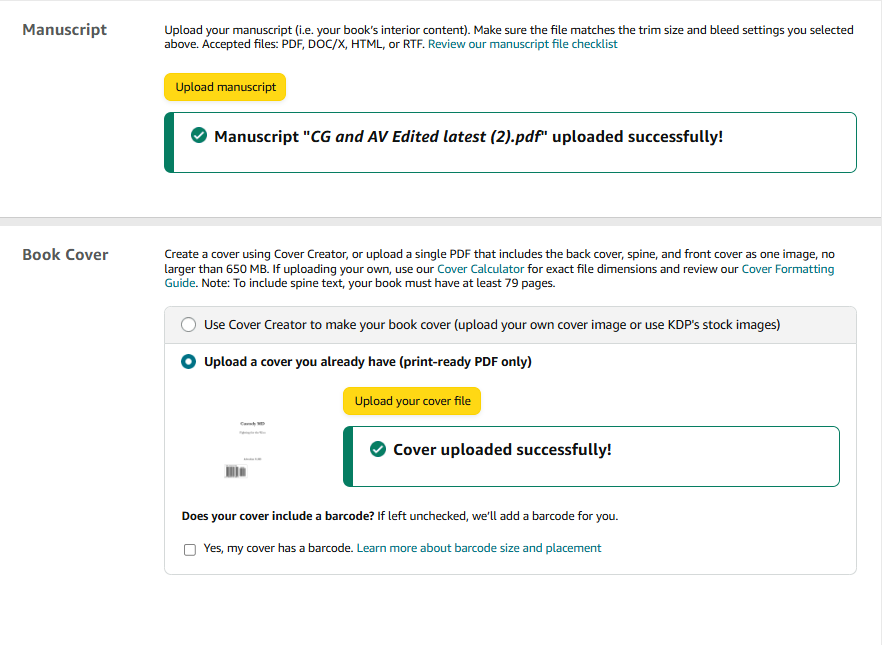
Upload Your Book Manuscript
This is your actual book interior; all the pages your readers will see.
Upload a PDF or Word (DOC/DOCX) file
Make sure the file matches your selected trim size. If you’re not sure, go to your Word file, then select Layout on the top menu bar to verify.
Use black & white text unless your book needs color (e.g. kids books, cookbooks)
Double-check formatting, no cut-off text, extra blank pages, or weird spacing, every heading starting from the beginning of the page, ideally; use page breaks. If you need help, we offer quick book formatting services for authors.
Next: upload your book cover file.
Upload Your Book Cover
Your cover file should be one PDF file that includes the front cover, spine, and back cover; all in a single image.
Must be PDF only, even if your manuscript is in Word.
KDP gives you the option to auto-generate a barcode, so you don’t need to include it unless you have one already.
You can use their Cover Creator tool if you don’t have a custom design yet, but it’s not recommended as the options are few and not ideal.
Keep it simple, hire a designer or use KDP’s templates to get the sizing right. Book cover is the first thing people see.
AI-Generated Content Disclosure
KDP will ask if your book includes any AI-generated content, like text or images made using tools such as ChatGPT or Midjourney.
Select Yes if you used AI to create actual parts of the book
Select No if you wrote everything yourself and just used AI for ideas or support
Note: While creating images for your cover on AI seems easy, it’s easily detectable by readers due to the vast use of AI, and gives a bad impression. Similarly, AI content is easily detectable by Amazon, which doesn’t prefer ranking artificial books, as well as people who use AI and can easily detect it. Better to hire a proper designer and professional book editing services to do it properly and not take such risks.
Once uploaded, click on “Generate Preview” and wait to see how it looks.
Review the book properly in the next section to see if there are any errors.
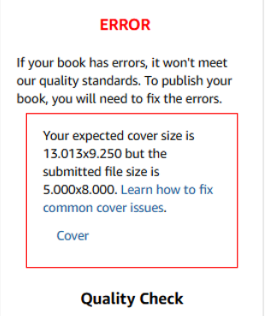
If you get an error like this:
“Your expected cover size is 13.013x 9.250, but the submitted file size is 5000 x 8.000”
The fix is simple. Simply go to AVEPDF and upload your cover, then choose the correct dimensions as per Amazon’s requirements. Then download it from there and re-upload it on KDP, problem solved.
Then click next. We’re almost there.
Step 4: Set Your Book Pricing and Distribution
This is the final step before publishing on Amazon. Here, you’ll choose where your book will be sold, how much it’ll cost, and how much you’ll earn per sale.
Choose Territories
Select where you want Amazon to distribute your book.
All territories (recommended): Amazon will make your book available worldwide
Individual territories: Choose specific countries if you want limited access
Unless you have a legal reason to limit it, go with All territories to maximize reach.
Set Your Primary Marketplace
Choose the Amazon store where your pricing will be based, for example:
Amazon.com (US) if most of your readers are in the U.S.
Amazon.co.uk if you’re targeting the UK
Prices in other countries will be automatically converted from this base.
Set Your Book Price
Enter your list price for the primary marketplace. KDP will show you:
Minimum price allowed based on printing cost
Your royalty for each copy sold
Make sure your pricing is competitive but still gives you a decent royalty.
For most authors, a good paperback price falls between $9.99 and $14.99. If your book is short (under 150 pages), pricing around $9.99 to $11.99 is reasonable. For medium-length books (150–250 pages), $12.99 to $13.99 is standard. Longer books (over 250 pages) can go up to $14.99 or $15.99, especially if they’re in-depth nonfiction, guides, or premium formats. Just make sure your price covers the printing cost and leaves you a fair royalty, Amazon shows this while you’re setting it.
Select Expanded Distribution (Optional)
This option allows your book to be distributed beyond Amazon, like to bookstores, libraries, and other retailers.
You earn a lower royalty (usually 40%)
But your book becomes available in more places
If you’re just starting out, you can leave this off and turn it on later. We also do not suggest distributing your book with Amazon, as they barely distribute it anywhere. Our Book Self-publishing services offer distribution on up to 30+ different platforms globally, so if you’re interested, check it out.
Final Step: Launch Your Book to the World.
Once done, click “Publish my Book.” And that’s it, you’re done.
If there are any errors, Amazon will email you in the next 2-3 business days letting you know what was wrong. But if you followed all the steps mentioned above correctly, no error should occur, as we’ve covered everything needed to ensure the process goes smoothly.
Publishing a book on Amazon KDP may seem technical at first, but once you go through it step by step, like we just did, it becomes a smooth and repeatable process.
Now that you know how to publish on Amazon KDP with screenshots and detailed guidance, you’re fully equipped to bring your book to life and share it with readers everywhere.
Take a deep breath, hit that button, and welcome yourself to the world of published authors.
Cheers!
Frequently Asked Questions (FAQs)
1. Is it free to publish a book on Amazon KDP?
Yes, publishing on Amazon KDP is completely free. You only pay when someone buys your book, the printing cost is deducted from your royalty.
2. How long does it take for my book to go live on Amazon?
It usually takes up to 72 hours for Amazon KDP to review and publish your book. In most cases, paperback versions go live within 24–48 hours.
3. Do I need an ISBN to publish on KDP?
KDP provides a free ISBN for paperback and hardcover formats. You can also use your own ISBN if you want full control over the publishing imprint.
4. Can I publish the same book as both eBook and paperback?
Yes, you can publish both formats under the same title. Just make sure each version has its own properly formatted file and metadata.
5. Can I edit my book after it’s published?
Yes. You can update your manuscript, cover, description, or pricing at any time. Just log in, make changes, and resubmit, Amazon will re-review the book before changes go live.
Writers of the West is a full-service ghostwriting and publishing firm with over two decades of experience helping authors bring their stories to life. From first-time writers to seasoned executives, we have guided hundreds of authors through ghostwriting, developmental editing, and publishing across memoir, business, nonfiction, fiction, and self-help. Based across Houston, Los Angeles, and New York, our team combines editorial expertise with publishing strategy to deliver books that are professionally written, properly structured, and built to last.