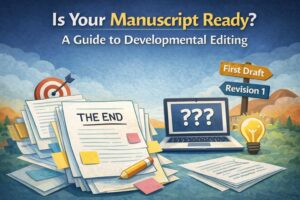
Introduction
You’ve finished the manuscript. That should feel amazing. And it does, for about five minutes. Then the questions start piling up. Editing. Covers. Amazon. ISBNs. Launches. Reviews. Suddenly, the book you were proud of feels fragile, like one wrong move could sink it before it ever reaches a reader.
That’s where most authors get stuck. Not because they can’t write, but because they don’t know what comes next or what actually matters.
“Manuscript to market” is not just hitting publish. It includes production, distribution, launch, and what you do after the book is live. Miss a step and your book does not fail loudly. It quietly vanishes.
This self publishing checklist is for first time authors who want a clear path, busy professionals who don’t have time to wander, and fiction or nonfiction writers who want a book that looks legitimate and sells with intention. Think of it as a printable, step by step mindset. One task at a time. No guessing.
Depending on your editing and design needs, this process can take anywhere from four weeks to six months. Faster if your draft is clean. Longer if you want it polished. Either way, the goal is the same. Move forward with confidence, knowing exactly what needs to happen and when.
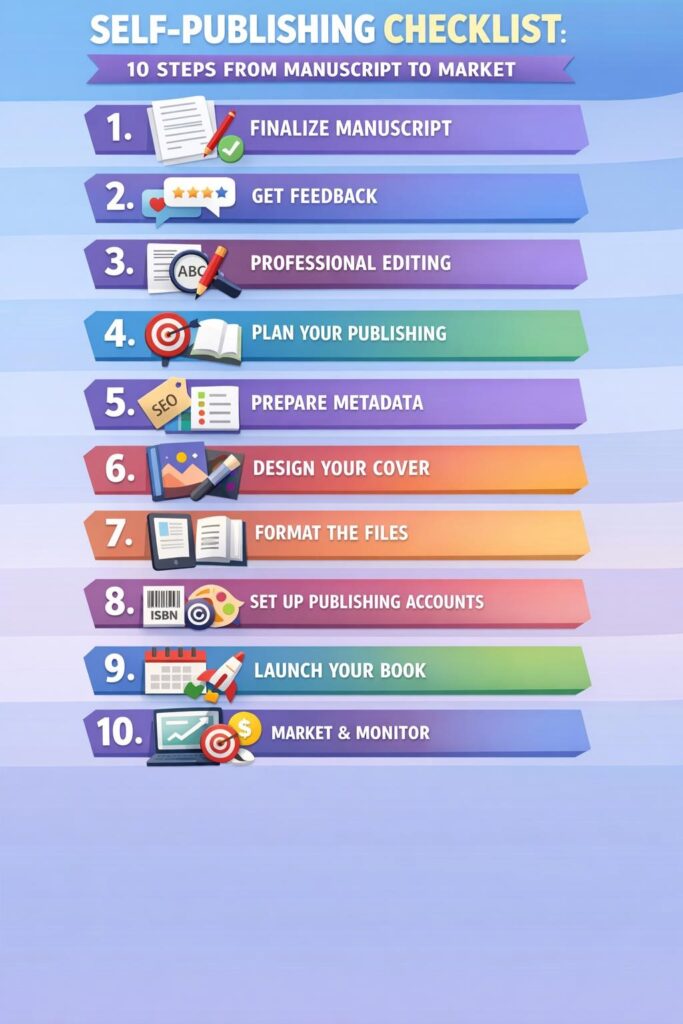
The 10-Step Self-Publishing Checklist
This is the part most guides rush through. They give you a list, tell you to follow it, and assume every book takes the same path. It doesn’t.
Some authors come in with a clean draft and momentum. Others have a strong idea buried under years of revisions. Some want speed. Others want polish. This checklist works because it is sequential, not rigid. Each step builds on the last, and skipping ahead almost always creates expensive problems later.
You will notice something important as you move through these steps. The earlier decisions reduce pressure on the later ones. A locked manuscript makes editing cheaper. Clear positioning makes covers easier. Strong metadata makes marketing lighter.
If you plan to use professional self publishing services at any point, this checklist helps you hire them at the right time and for the right job. No wasted money. No paying twice for the same fix.
Read each step before you act on it. Know what “done” actually looks like. Then move forward.
Step 1: Lock the Manuscript (Self-Edit + Final Revisions)
Before you think about editors, covers, or publishing platforms, your manuscript has to stop moving.
“Final draft” does not mean perfect. It means the book is no longer changing at a structural level. The argument is clear. The story holds. The promise you make to the reader is consistent from beginning to end.
At this stage, locking the manuscript means confirming four things:
- The structure works. Chapters are in the right order and each one earns its place.
- Clarity is solid. Readers understand what is happening or what you are teaching without rereading.
- Continuity holds. Timelines, character details, terminology, and examples stay consistent.
- Facts are checked. Names, dates, references, and claims are accurate.
If you are still adding chapters, removing major sections, or rewriting the core idea, the manuscript is not locked yet.
A fast self-edit workflow that keeps you from spiraling:
Start with a full read-through. No editing. Just notes. Mark where you skim, where you feel confused, and where your attention drops.
Next, create a reverse outline. Write one sentence for each chapter explaining its purpose. If a chapter cannot be summarized clearly, it needs revision.
Then do a consistency pass. Look only for repeated issues like terminology changes, timeline gaps, or formatting habits that drift.
Finish with chapter openings and closings. Openings should orient the reader quickly. Closings should either resolve a question or create momentum into the next chapter.
When this step is complete, you should feel steady, not euphoric. The manuscript should feel finished enough that any further changes would be improvements, not repairs.
Step 2: Get Feedback Before You Pay for Editing (Beta + Sensitivity as Needed)
Once your manuscript is locked, the instinct is to move straight to editing. Slow down. This step is about seeing your book through fresh eyes while changes are still easy to make.
Why Feedback Comes Before Editing
Editors are expensive. Their time should be spent refining a strong foundation, not pointing out avoidable problems. Early feedback helps you fix structural or clarity issues before they become paid fixes.
This matters even if you plan on DIY book publishing from start to finish. Feedback reduces blind spots, not just errors.
Choosing the Right Beta Readers
Beta readers should look like your future readers. Not other authors. Not supportive friends who will praise everything. You want people who will read honestly and finish the book.
Five to ten beta readers is usually enough. Fewer than that and you miss patterns. More than that and you drown in opinions.
What to Ask Beta Readers
Vague questions lead to vague feedback. Be specific.
Ask things like:
- Where did you feel confused or slow down?
- Which sections felt repetitive or unnecessary?
- Where did you feel most engaged?
- What promise did you think the book was making to you?
These questions reveal experience, not preferences.
How to Handle Conflicting Feedback
Conflicting feedback does not mean something is wrong. It means readers are reacting from different angles.
Do not count votes. Look for overlap. If multiple readers stumble in the same place, the issue is real even if they describe it differently.
If only one reader flags an issue, treat it as a data point, not a directive.
When Sensitivity Readers Are Necessary
Sensitivity readers are not optional when you are writing outside your lived experience in meaningful ways. This includes culture, identity, trauma, or marginalized perspectives.
Their role is not to edit your prose. It is to identify harm, stereotypes, or misrepresentation you may not see on your own.
What “Done” Looks Like for This Step
You are finished with this step when you have:
- Reviewed all feedback
- Identified clear patterns
- Made targeted revisions
- Stopped second guessing every sentence
At the end, you should not feel overwhelmed. You should feel clearer.
Step 3: Professional Editing (Know Which Type You Need)
Once feedback is incorporated, it is time to bring in a professional editor. This is where your book stops being a draft and starts becoming a product.
The Four Types of Editing Explained
Not all editing is the same, and hiring the wrong type at the wrong time is one of the most common mistakes authors make.
Developmental editing focuses on the big picture. Structure, pacing, logic, and flow. If chapters feel out of order or the argument does not land, this is what you need first.
Line editing works at the sentence level. Voice, rhythm, clarity, and tone. This is where good writing becomes readable writing.
Copyediting fixes grammar, spelling, consistency, and factual accuracy. It makes the text clean and professional.
Proofreading is the final pass. It catches small errors after the book has been formatted. It should never be the first edit.
The Costly Editing Order Mistake
Many authors pay for proofreading too early because it feels safe and affordable. It is also usually wasted money.
If you change paragraphs, chapters, or sections after proofreading, you reintroduce errors. Editing should move from big to small, never the other way around.
Think of it like a book formatting guide. You do not polish the layout before the content is finished. Editing follows the same logic.
How to Prepare an Editor Package
Editors work best when they understand the context of your book.
Before you hire a book editor, prepare:
- A clean manuscript file
- Your genre and target reader
- The goal of the book
- Your timeline and budget range
This helps the editor recommend the right service instead of selling you the wrong one.
Editing Checkpoints to Expect
A professional edit is not instant. Expect:
- An initial review or sample edit
- Written feedback or tracked changes
- Time for you to revise
- A possible second pass, depending on scope
Rushing this step shows up later in reviews.
What “Done” Looks Like for Editing
You are finished with this step when:
- Structural issues are resolved
- Language is clear and consistent
- Errors are minimal and intentional
- The manuscript feels stable again
Editing should leave you confident, not defensive. If you feel stronger about the book after this step, you hired the right kind of help.
Step 4: Define Your Publishing Plan (Goals, Format, and “KDP Select vs Wide”)
Before you upload anything, you need a plan. Not a vague hope, not a loose idea, a real definition of what success looks like for this book.
Start With Clear Success Metrics
Ask yourself what you actually want this book to do.
Is the goal direct revenue? Growing a readership? Building authority in your field? Feeding a speaking or consulting pipeline? Setting up a series?
Different goals require different decisions. A book meant to support a business is launched differently than a book meant to build a long fiction catalogue. This is why a self publishing checklist only works when each step is connected to intention, not guesswork.
Choose Formats in the Right Order
You do not need every format on day one.
For most authors, the smartest order is:
- Ebook first, fastest and most flexible
- Paperback next, for credibility and reach
- Hardcover only if the genre supports it
- Audiobook once the text has proven demand
Each format adds complexity. Add them deliberately.
Amazon First or Wide Distribution
This decision shapes everything that follows.
An Amazon first approach offers simplicity, visibility tools, and ease of setup. It can be effective, especially for genre fiction and early traction.
Wide distribution means selling across multiple retailers. It offers stability and broader reach, but requires more setup and ongoing management.
There is no universally correct answer. The right choice depends on your goals, timeline, and tolerance for complexity.
How This Decision Affects ISBN, Pricing, and Marketing
Distribution choices influence:
- Whether you need your own ISBN
- How you price each format
- Which promotions you can run
- Where your marketing efforts focus
Changing direction later is possible, but it is far easier when this step is thought through early.
What “Done” Looks Like for This Step
You are finished when:
- Your primary goal is clearly defined
- Your launch format is chosen
- Your distribution path is decided
- Your next steps feel obvious
Clarity here removes friction everywhere else.
Step 5: Nail the Market-Ready Package (Positioning + Metadata)
This is the step where good books fail if it is done poorly. Not because the writing is bad, but because the market cannot tell what the book is for.
Positioning and metadata are how readers find you and decide if your book is worth their time.
Book Positioning Basics
Positioning answers one core question. Why should this reader choose this book right now?
You need to be clear on:
- Who the book is for
- What problem it solves or experience it delivers
- Where it belongs on the shelf
- Which comparable books it sits next to
If you cannot describe your book in one clear sentence to the right reader, the market will struggle to understand it too.
Understanding Comparable Titles
Comparable titles, often called comps, are not about copying. They are about context.
Look for books that:
- Share your genre and audience
- Are actively selling
- Are positioned similarly in tone or promise
These books guide your pricing, cover direction, and category choices. They also help retailers understand where to place your book.
Metadata That Actually Matters
Metadata is not busywork. It is sales infrastructure.
Your core metadata includes:
- Title and subtitle that signal value or story
- Keywords readers actually search for
- Categories that balance relevance and competition
- A description that hooks emotionally
- BISAC codes for wider distribution
- An author bio that builds trust or connection
Weak metadata makes even strong marketing underperform.
Writing a Blurb That Converts
Blurbs are not summaries. They are invitations.
For fiction, focus on tension, stakes, and emotional payoff. Make the reader feel something.
For nonfiction, focus on outcomes. What will change after the last page?
Avoid explaining everything. Curiosity sells better than completeness.
When to Get Help With This Step
This is where many authors turn to self publishing services, not because they cannot write, but because positioning requires distance and market awareness. A second set of trained eyes can save months of trial and error.
What “Done” Looks Like for This Step
You are finished when:
- Your audience is clearly defined
- Your book fits a recognizable category
- Your description feels compelling, not informational
- Your metadata aligns across platforms
When this step is done well, every other part of publishing works harder for you.
Step 5: Nail the Market-Ready Package (Positioning + Metadata)
This is where good books quietly fail. Not because the writing is weak, but because the book is hard to place, hard to describe, or easy to misunderstand.
Positioning and metadata tell the market how to read your book before anyone opens page one.
Start With Clear Positioning
Positioning answers one simple question. Who is this book for, and why should they care?
You need four things nailed down:
- A specific audience, not everyone
- A clear promise or outcome
- The shelf your book belongs on
- Comparable titles that already sell
If you cannot name where your book sits in a store or online category, readers will not know where to find it.
Understand the Role of Metadata
Metadata is not admin work. It is discoverability.
Your metadata includes:
- Title and subtitle
- Keywords
- Categories
- Book description
- BISAC codes
- Author bio
Each piece helps retailers decide when and where to show your book. Guessing here costs visibility.
Writing a Description That Converts
A book description is not a summary. It is a sales page.
For nonfiction, lead with the problem and the outcome. What changes for the reader after they finish the book?
For fiction, sell the experience. Stakes, tone, and emotional pull matter more than plot detail.
Short paragraphs. Clear hooks. No filler.
Keywords and Categories That Actually Help
Good keywords match reader intent, not ego.
Avoid vague terms. Focus on phrases readers type when they are already looking to buy. Categories should be relevant and achievable, not the largest possible option.
This is where many DIY book publishing projects rely on hope instead of strategy. Metadata rewards precision.
What “Done” Looks Like for This Step
You are finished when:
- Your audience is clearly defined
- Your promise is obvious in the description
- Your categories fit the book naturally
- Your metadata feels intentional, not random
When this step is done well, marketing gets lighter. Readers self-select. And your book stops fighting the algorithm.
Step 6: Cover Design That Sells (Not Just “Looks Nice”)
Covers do one job. They get the click.
Readers make decisions fast. Often in seconds. If your cover does not signal the right genre, tone, and promise immediately, the book is skipped without a second thought.
Why Genre Expectations Matter
Every genre has visual language. Typography, color palettes, imagery, spacing. These are not trends. They are signals.
When a reader scans a page of thumbnails, they are asking one question. Does this look like the kind of book I want to read?
A cover that breaks genre conventions rarely looks bold. It looks confusing.
Typography and the Thumbnail Test
Your cover must work at full size and at the size of a postage stamp.
Test it small. If the title is hard to read or the image turns to mush, the design is not doing its job. Clean typography beats clever concepts every time.
Required Cover Deliverables
A professional cover includes more than one file.
You will need:
- An ebook cover
- A full print wrap
- Correct spine width based on page count
- Proper color profiles for print
Skipping these details creates delays and rework later.
How Covers Connect to Formatting
Your cover and interior must agree with each other. Trim size, spine width, and page count are all connected.
Think of the cover as the front door and the interior as the house. Both need to be built from the same plan. This is where many authors realize too late that they needed a professional book formatting guide before locking design decisions.
Common Cover Mistakes That Hurt Sales
Avoid these:
- Overcrowded designs
- Low contrast text
- Ignoring genre norms
- Designing for personal taste instead of the reader
A cover does not have to be beautiful. It has to be effective.
What “Done” Looks Like for This Step
You are finished when:
- The genre is instantly recognizable
- The title is readable at thumbnail size
- All required files are delivered
- The cover aligns with your book’s positioning
Step 7: Format the Interior (Ebook + Print) and Build Front and Back Matter
If the cover gets the click, the interior earns the trust.
Formatting is where many books start to feel real, and where small mistakes quietly signal amateurism. This step is not about decoration. It is about readability, flow, and meeting platform requirements without friction.
Ebook Formatting vs Print Formatting
Ebooks and print books behave differently, and they must be treated differently.
Ebooks use reflowable text. Font size, spacing, and layout adapt to the reader’s device. Clean styles matter more than visual design.
Print books use fixed layouts. Page size, margins, headers, and page numbers are locked. What looks fine on a screen can break on paper.
Treat these as separate jobs, even if the content is the same.
Front Matter Essentials
Front matter sets the tone and handles the legal basics.
Your front matter typically includes:
- Title page
- Copyright page
- ISBN information if applicable
- Disclaimers when needed
- Dedication
- Table of contents
Keep it clean. No clutter. No unnecessary pages.
Back Matter That Builds Momentum
Back matter is one of the most underused assets in publishing.
This is where you guide the reader to what comes next:
- A clear call to action to join your email list
- A reader magnet or bonus
- A sample of the next book
- An about the author section that feels human
Done well, this turns a finished book into the start of a relationship.
Common Formatting Mistakes to Avoid
Watch for these:
- Inconsistent headings
- Extra spacing between paragraphs
- Broken page breaks
- Missing or messy tables of contents
These errors are easy to miss and hard to unsee once a reader notices them.
What “Done” Looks Like for This Step
You are finished when:
- Ebook and print files pass platform checks
- The book reads smoothly in multiple formats
- Front and back matter are complete and intentional
- Nothing pulls attention away from the content
This step connects production to launch. When it is done right, everything else on your self publishing checklist moves faster and with fewer surprises.
Step 8: Legal and Publishing Setup (ISBN, Copyright, Imprints, Accounts)
This is the least exciting step and one of the most important. Get it right and you never think about it again. Get it wrong and you spend months untangling avoidable problems.
ISBN Decisions and Tradeoffs
An ISBN identifies the publisher of record, not the author.
Platform provided ISBNs are fine if you plan to stay on that platform and want simplicity. Owning your own ISBN gives you control, flexibility, and consistency across retailers, but it costs more.
Neither option is morally superior. The right choice depends on how wide you plan to distribute and how much control you want long term.
Copyright Basics You Should Understand
Copyright exists the moment you write the book. Registration adds an extra layer of protection and proof.
You do not need to register to publish, but registration can matter if disputes arise. Keep this step simple and do not overthink it.
Pen Names and Imprints
Pen names are branding tools. Imprints are publishing labels. Neither automatically creates legal protection.
Use a pen name if it helps readers understand genre or tone. Use an imprint if you want a professional publisher name attached to your ISBNs.
If this step starts to feel complex, pause. This is where some authors choose to work with self-publishing services for setup guidance rather than guessing.
Platform Account Setup
At a minimum, you need:
- An Amazon KDP account
- Tax and payment information completed
- Author profile basics filled out
If you plan to publish wide, this is where you add additional distributor accounts. Do not rush this. Small errors here can delay payouts later.
What “Done” Looks Like for This Step
You are finished when:
- ISBN decisions are finalized
- Copyright approach is clear
- Pen name or imprint is set
- All publishing accounts are live and verified
This step creates the foundation your book stands on. Once it is locked, you are finally ready to think about launch.
Step 9: Launch Prep (Build the Marketing Assets Before You Hit Publish)
Publishing is a button. Launching is everything that happens before and after you press it.
Most weak launches fail long before release day. Not because the book is bad, but because nothing was built to support it.
Start With a Simple Launch Timeline
You do not need a complicated plan. You need a clear one.
A basic pre-launch timeline usually includes:
- Two to four weeks of prep
- Time to gather early readers
- Time to warm up your audience
- Time to set up retailer pages and links
Working backward from your release date keeps this step manageable.
Build Your Core Marketing Assets First
Do not announce anything until these exist.
At minimum, prepare:
- A simple landing page for the book
- An email sequence for launch week
- Social post ideas you can reuse
- A basic media or information page if you plan outreach
Assets reduce stress. They stop you from scrambling at the worst possible moment.
Reviews and ARC Teams Done the Right Way
Early reviews matter, but how you get them matters more.
An ARC team is a small group of readers who receive the book early in exchange for an honest review. No incentives. No pressure. No scripts.
Focus on readers who finish books, not people who promise support.
Always follow retailer policies. Violations here can hurt visibility or worse.
Newsletter and Audience Warm-Up
If you have an email list, this is the time to use it.
Share behind the scenes updates. Talk about the why behind the book. Invite readers into the process.
If you do not have a list yet, keep it simple. One clear sign-up opportunity is enough.
Optional Ads and Promotions
Ads are optional, not mandatory.
If you use them, start small. Test messaging, not budgets. Promotions work best when the book page is already strong.
Never use ads to compensate for weak positioning or unclear descriptions.
What “Done” Looks Like for This Step
You are finished when:
- All assets are built
- Early readers have access
- Retailer pages are live
- You know exactly what happens on launch day
When this step is done well, launch week feels focused instead of frantic.
Step 10: Publish and Post-Launch Optimization (Weeks 1 Through 8)
Hitting publish feels like the finish line. It is not. It is the starting gun.
The first eight weeks after release determine how far your book can go and how much momentum it keeps.
Launch Week Execution
Launch week is about focus, not noise.
Check the basics first:
- Pricing is correct across formats
- Categories and keywords are in place
- Buy links work
- Emails are scheduled and sent
If you planned promotions or ads, this is when they begin. Keep an eye on performance, but do not panic tweak every hour.
Monitor Early Data Without Obsessing
Early numbers matter, but they need context.
Watch for:
- Sales and page reads
- Click through on your description
- Review velocity, not just totals
Do not make sweeping changes in the first few days unless something is clearly broken.
Optimize Metadata and Description
This is where iteration happens.
Test:
- New keywords
- Secondary categories
- Slightly revised descriptions
Small changes can create meaningful shifts in visibility. This step turns your launch into a learning phase instead of a one time event.
Extend Momentum Beyond Launch Week
Most books fade because nothing follows the launch.
Post-launch momentum can include:
- Newsletter swaps
- Limited time promos
- Guest content
- Reader focused updates
Consistency beats intensity.
Build Long-Term Marketing Systems
Think beyond this book.
Strong systems include:
- Ongoing email content
- A content library tied to your book
- Strategic promotions
- A clear next book plan
This is where your self publishing checklist loops back on itself. Each book makes the next one easier to launch and easier to sell.
What “Done” Looks Like for This Step
You are finished when:
- The book is stable in the market
- Metadata has been refined at least once
- A long term plan exists
- You are no longer reacting, only adjusting
Publishing rewards authors who stay engaged after release. This step is how you do that without burning out.
Suggested Timelines
There is no single correct pace for publishing a book. Speed is only helpful when it matches the condition of the manuscript and your available bandwidth. The wrong timeline creates stress, sloppy decisions, and avoidable rework.
Choose the path that fits your situation, not your impatience.
Fast Track Timeline (2 to 4 Weeks)
This timeline works only if the manuscript is already clean and focused.
Best for:
- Short nonfiction
- Experienced writers
- Minimal revision needs
What this usually includes:
- Light self edits only
- No developmental changes
- Simple cover and basic formatting
- Small or no launch plan
This approach prioritizes speed over polish. It can work, but only when expectations are realistic.
Standard Timeline (6 to 12 Weeks)
This is the most common and balanced option.
Best for:
- First time authors
- Most fiction and nonfiction projects
- Authors who want quality without overbuilding
What this usually includes:
- Beta feedback and revisions
- Professional editing
- Professional cover design
- Proper formatting and metadata setup
- A planned but manageable launch
This timeline gives you space to make good decisions without dragging the process out.
Premium Timeline (3 to 6 Months)
This is the slowest option and often the strongest.
Best for:
- Books tied to a brand or business
- Series starters
- Authors building a long term platform
What this usually includes:
- Deep developmental editing
- Multiple editing passes
- Advanced positioning and metadata testing
- Platform and audience building
- Larger launch strategy
This timeline is not about perfection. It is about leverage.
How to Choose the Right Timeline
Ask yourself three questions:
- How clean is the manuscript right now
- How much time can you realistically give this each week
- What does this book need to do for you long term
A timeline is a tool, not a rule. Pick one, commit to it, and move forward with intention.
Budget Snapshot
Money does not make a book good. But spending in the wrong places can absolutely make it worse.
The goal is not to spend as little as possible. The goal is to spend where it actually improves the reader’s experience.
Where Authors Overspend
Most overspending comes from fear, not strategy.
Common traps include:
- Buying too many tools before they are needed
- Running ads before the book page is ready
- Paying for services that solve the wrong problem
This is especially common in DIY book publishing, where authors try to compensate for uncertainty by throwing money at every option.
Where Spending Matters Most
Two areas consistently deliver the highest return:
- Editing, because clarity and structure affect every reader
- Cover design, because it determines whether the book gets clicked
These are not the places to cut corners.
Typical Cost Ranges
Costs vary widely based on experience, scope, and turnaround time, but general ranges look like this:
- Editing: from several hundred to several thousand dollars
- Cover design: from a few hundred to over a thousand
- Formatting: typically a few hundred
Lower prices often mean limited scope. Higher prices usually reflect experience and depth, not guarantees.
What Actually Drives the Price
Pricing is influenced by:
- Word count
- Complexity of the content
- Turnaround expectations
- The experience level of the provider
Fast, cheap, and good rarely exist in the same package.
How to Budget Without Regret
Set a maximum budget before you start. Decide what matters most for this book, not an ideal version of your career.
A smart budget removes anxiety. You stop second guessing every decision because the limits are already clear.
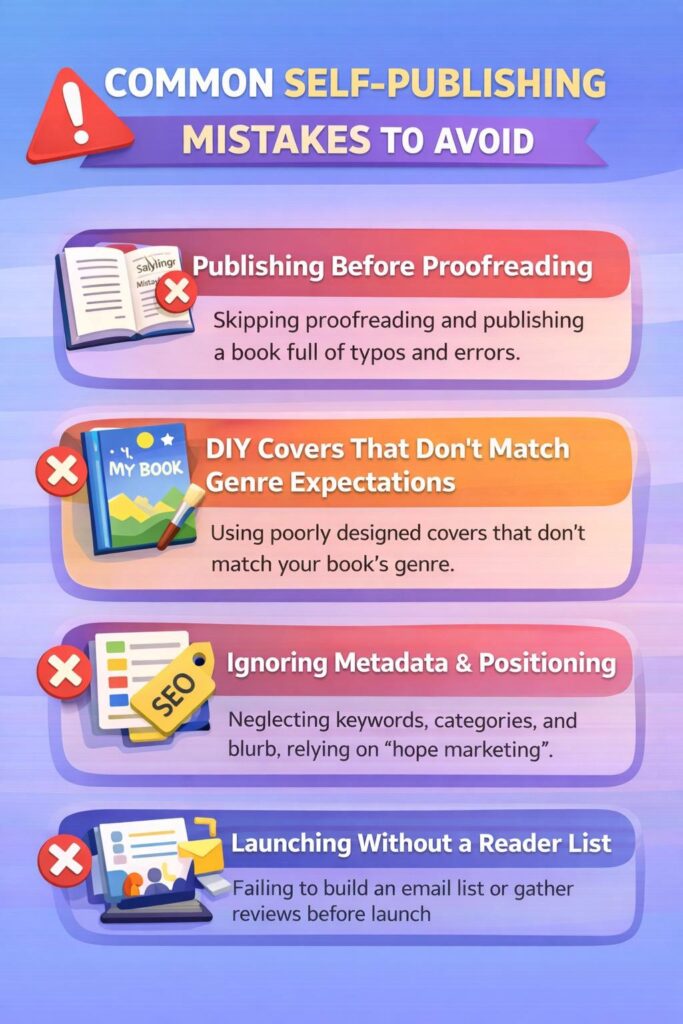
Common Mistakes to Avoid
Most publishing mistakes are not dramatic. They are quiet, easy to justify in the moment, and expensive later.
Avoiding these errors will do more for your book than chasing the latest tactic or shortcut.
Publishing Before Proofreading
This happens more than most authors want to admit.
Rushing to publish often means skipping a final proofread. Readers notice immediately. Reviews remember. Fixing errors after release never fully restores confidence.
Proofreading is the last line of defense. Do not skip it.
DIY Covers That Ignore Genre Expectations
A cover can look polished and still fail.
When your cover does not match genre signals, readers hesitate. Confusion kills clicks. Personal taste is not a substitute for market awareness.
Skipping Metadata and Relying on Hope
Hope is not a strategy.
Without clear keywords, categories, and positioning, retailers do not know where your book belongs. If the system cannot place it, it cannot recommend it.
Launching Without a Reader or Review Plan
Uploading a book is not a launch.
Even a small group of early readers and a simple review plan can create momentum. Without that, your book enters the market cold and stays there.
Treating Marketing as a Rescue Mission
Marketing cannot fix a weak foundation.
Some authors assume that hiring the best book marketing services will compensate for unclear positioning, poor covers, or rushed editing. It will not. Marketing amplifies what already exists, good or bad.
What to Keep in Mind
Most mistakes come from impatience or avoidance.
Slow down where it matters. Make decisions before you promote. And remember that sustainable publishing is built on preparation, not panic.
Tools and Templates
You do not need more information. You need fewer decisions.
Tools and templates remove friction. They help you move forward without reopening the same questions every day. Think of these as support rails, not requirements.
Printable Checklist
A printable checklist turns the entire process into something you can see and finish.
Each step has a clear definition of done. No guessing. No vague progress. Just movement.
Use it to track where you are, what is next, and what you can safely ignore for now.
Beta Reader Questionnaire
Good feedback comes from good questions.
A beta reader questionnaire keeps responses focused on reader experience instead of personal taste. It also makes feedback easier to compare across readers.
This prevents the spiral of trying to please everyone.
Metadata Worksheet
Metadata decisions are easier when they are visible.
A worksheet helps you:
- Define your audience clearly
- Draft multiple title and subtitle options
- Brainstorm keywords intentionally
- Choose categories with purpose
Seeing everything in one place makes patterns obvious and weak spots easier to fix.
Launch Week Tracker
Launch week moves fast. Memory fails under pressure.
A simple tracker keeps you grounded. Emails sent. Links checked. Promos live. Tasks completed.
This is not about doing more. It is about forgetting less.
How to Use These Without Overthinking
You do not need every tool at once.
Pick what solves your current problem. Use it. Then move on.
Tools should create momentum, not become another project.
FAQs
1. How long does it take to self-publish a book from manuscript to launch?
Most authors fall somewhere between six weeks and six months. A clean manuscript with minimal edits can move quickly. A book that needs deeper revision, professional design, and a planned launch will take longer. The timeline should match the quality you want, not the pressure you feel.
2. Do I need an ISBN to self-publish on Amazon?
No. Amazon provides a free ISBN for print books published through its platform. That said, using your own ISBN gives you more control and flexibility if you plan to distribute widely or want to list yourself as the publisher of record.
3. What is the difference between copyediting and proofreading?
Copy editing focuses on grammar, consistency, clarity, and accuracy throughout the manuscript. Proofreading is the final check after formatting and is meant to catch small errors that slipped through. Proofreading should always come last.
4. Should I publish on Amazon only or go wide?
It depends on your goals. Amazon only is simpler and can work well for certain genres and early traction. Going wide offers broader reach and long term stability, but requires more setup and management. Neither choice is permanent.
5. What are the most important launch tasks if I am short on time?
Prioritize the fundamentals. A clear book description, the right categories, a professional cover, and a small group of early readers matter more than social media noise or ads.
6. How many beta readers do I need?
Five to ten is usually enough. The goal is to spot patterns, not collect opinions. Fewer readers can miss issues. Too many can overwhelm you with conflicting feedback.
7. What trim size should I choose for print?
Follow genre norms. Most nonfiction works well in five and a half by eight and a half inches. Many novels use five by eight or six by nine. Readers notice when a book feels off in their hands.
8. How do I choose keywords and categories that actually help sales?
Think like a buyer, not an author. Choose keywords that match what readers would type when they are ready to buy. Categories should be relevant and competitive enough to give your book visibility without burying it.
9. Can I change my cover, description, or keywords after publishing?
Yes. One of the advantages of self-publishing is flexibility. You can update covers, descriptions, keywords, and categories after launch. Many successful books improve over time through iteration.
10. What is a realistic first-book marketing plan with a small budget?
Focus on one channel you can sustain. An email list, direct reader outreach, and occasional promotions go further than spreading yourself thin. Consistency beats scale early on.
Conclusion
Self-publishing is not hard because the steps are complicated. It is hard because everything feels important at the same time.
This is why a clear process matters. When you know what to focus on now and what can wait, the noise fades. Decisions get simpler. Progress becomes visible.
This self publishing checklist is not about doing more. It is about doing things in the right order, with intention, and without panic. You do not need perfection. You need momentum paired with clarity.
Finish the step you are on. Ignore the rest until it is time. Build the book you would be proud to hand to a stranger.
From manuscript to market, that is how real publishing careers are made.